Gym Life
Responsive Gym/Fitness WordPress Theme
- created: 07/10/2015
- latest update: 12/30/2019
- by: Stronghold Themes
- email: strongholdthemes@gmail.com
Thank you for purchasing our theme. If you have any questions that are beyond the scope of this help file, please feel free to contact us. Thank you very much!
Features
- Responsive Layout
- Unlimited Color Schemes
- WooCommerce Ready
- Contact Form 7 ready
- The Events Calendar ready
- Visual Composer included (save $33)
- Revolution Slider included (save $18)
- Timetable Responsive Schedule For WordPress included (save $19)
- PayPal integration for classes and personal training
- Documentation included
- One-Click Demo Import
- Sample content included
- Child theme included
- Translation ready - translation files included
- RTL support
- Unlimited sidebars - can be set to left or right
- Gallery Albums with integrated lightbox
- Class Galleries
- Custom post types - Classes, Trainers, Galleries, Testimonials, Brands, Pricing Tables
- Trainer Profiles
- Customizable Footer widget area - supports one, two, three or four columns
- Custom logo & favicon
- 600+ Google fonts
- Built-in Author Box with Social Icons and Bio (Useful for Multiple Authors)
- Social media integration
- Font Awesome integrated
Theme Installation
Gym Life can be installed using one of two methods:
- WordPress admin dashboard installation
- FTP upload installation
WordPress admin dashboard installation
- Login
-
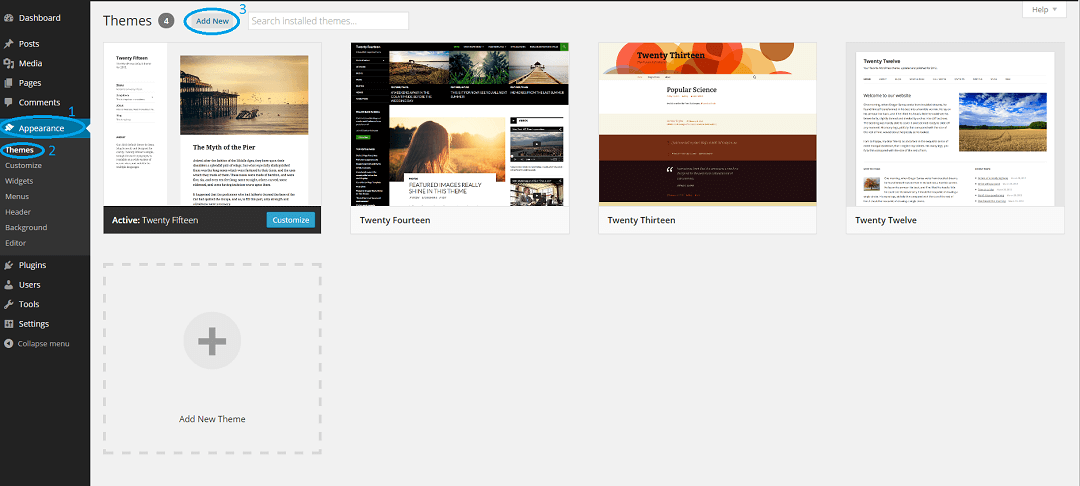
Click Appearance -> Themes -> Add New
-
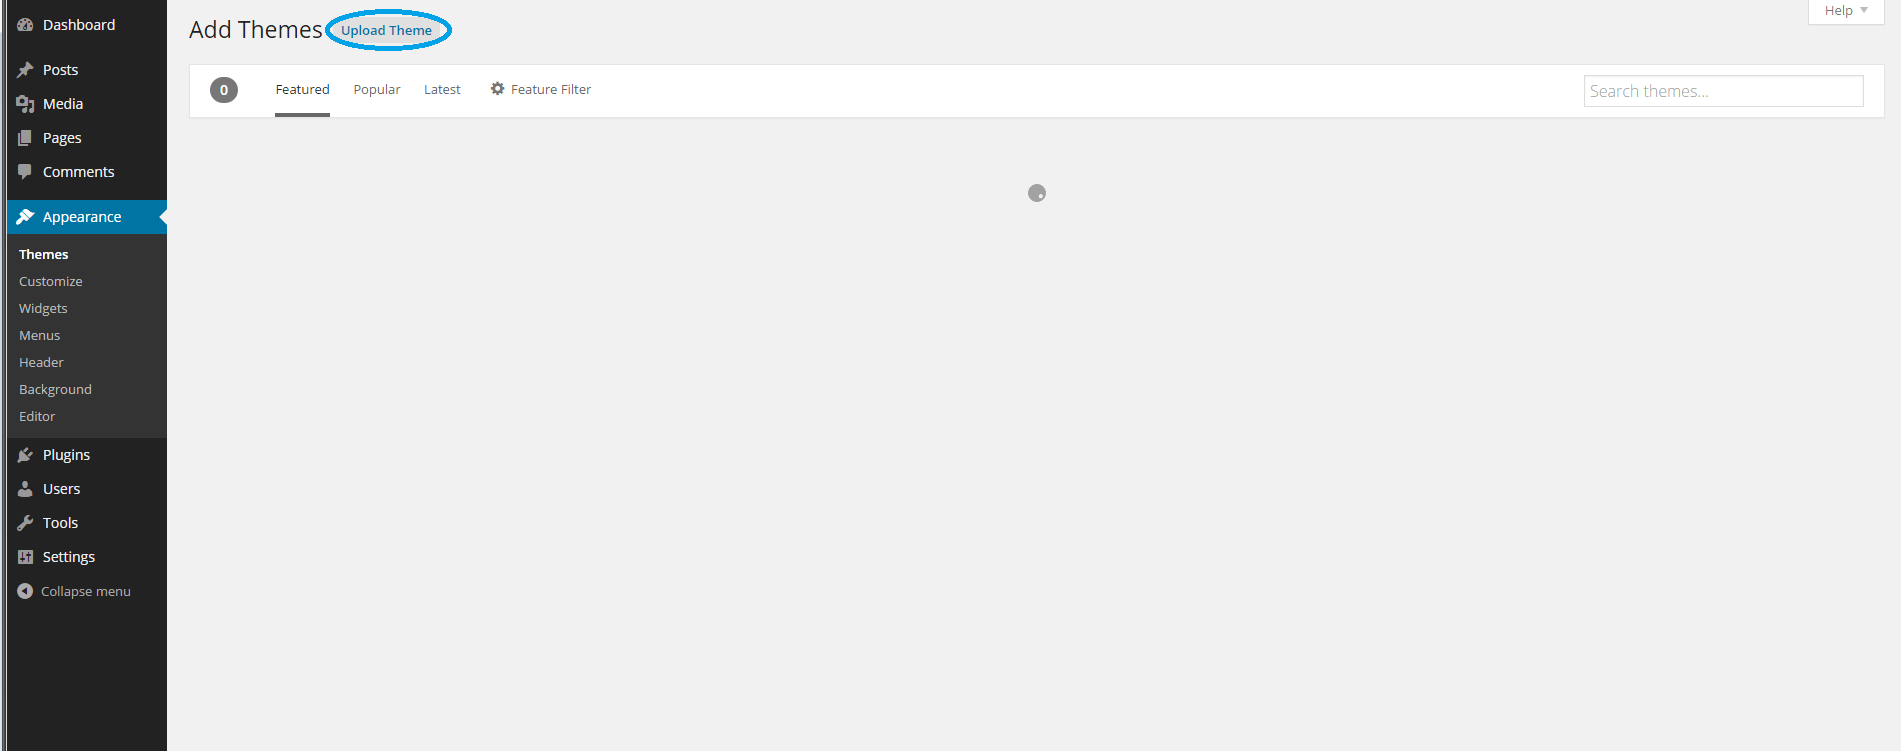
Click Upload Theme
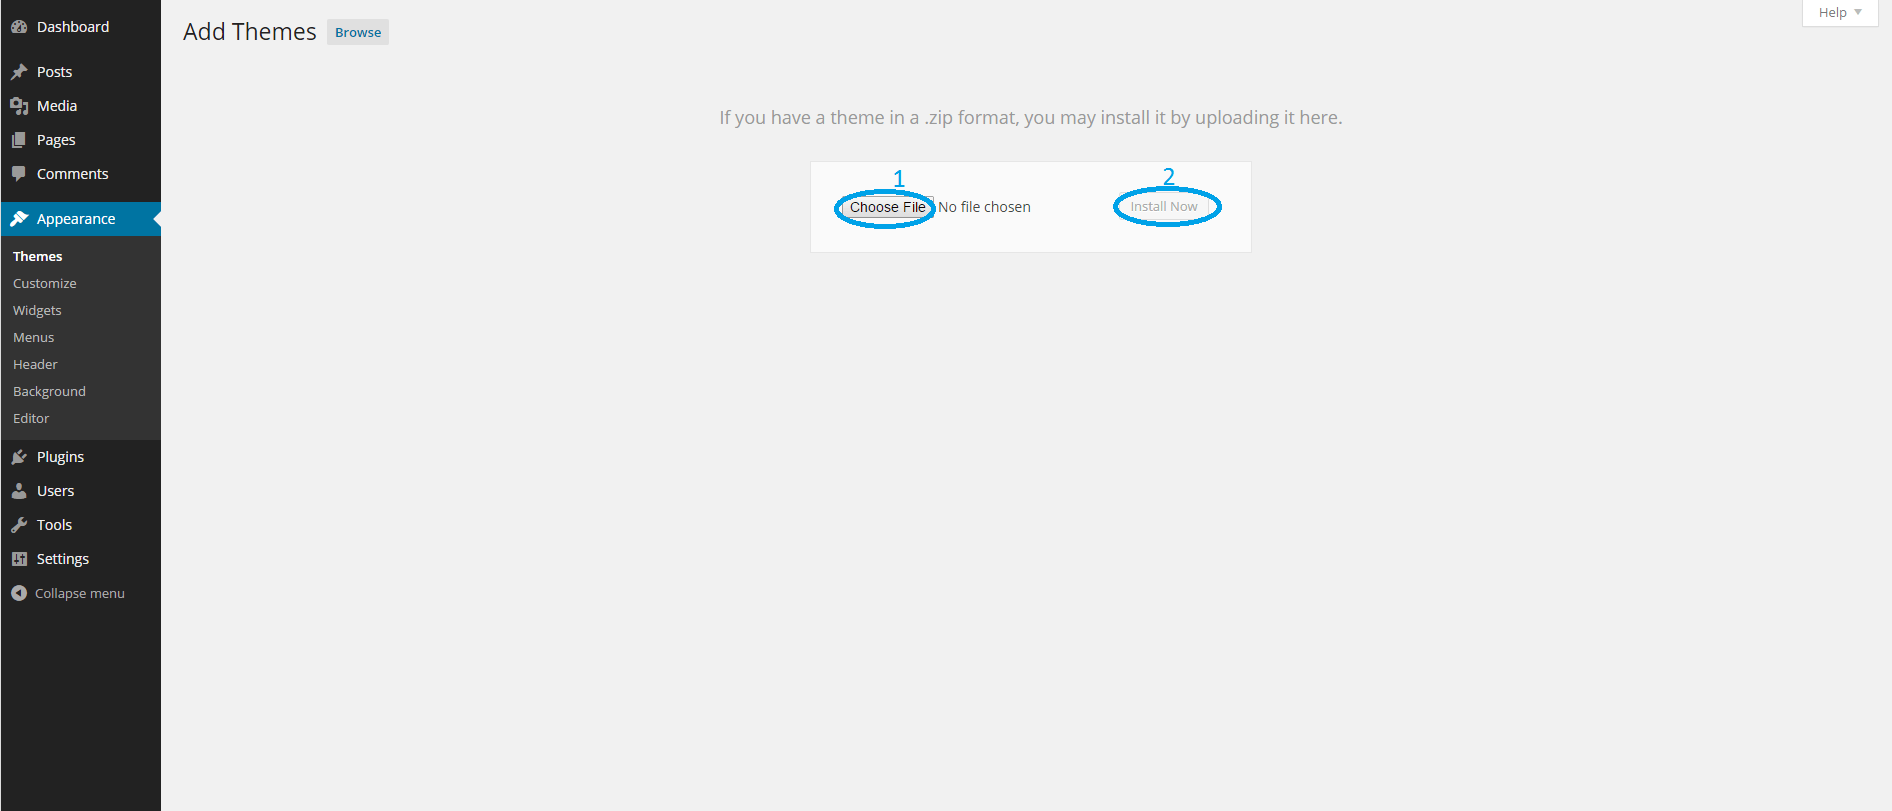
- Click Choose File then navigate to where the theme is downloaded and choose gym-life.zip to upload it.
-
Next click Install Now to begin the installation process.
-
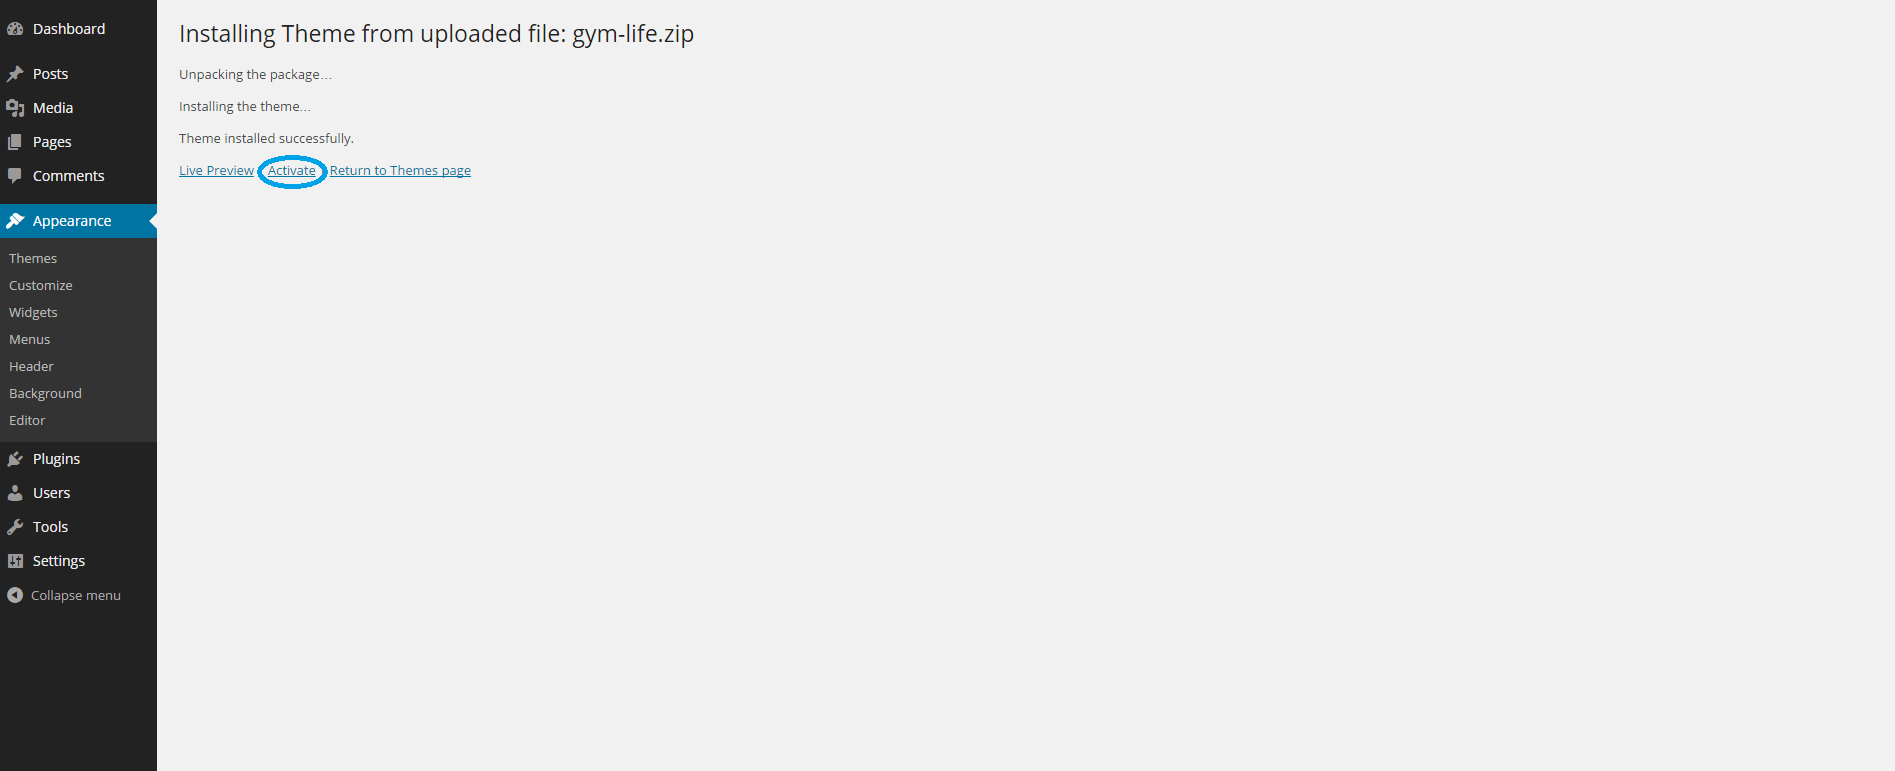
When the installation is finished you will see a screen similar to the one below. Click Activate to complete the process.
FTP upload installation
- Unzip the gym-life.zip file to get the gym-life theme folder
- Use your ftp client to navigate to the themes folder. To do this click the (wp-content) folder then click the themes folder.
- Upload the gym-life folder to the themes folder
- Login to the WordPress admin dashboard.
- Click Appearance -> Themes.
- Click the Activate button by the Gym Life theme.
Theme Setup
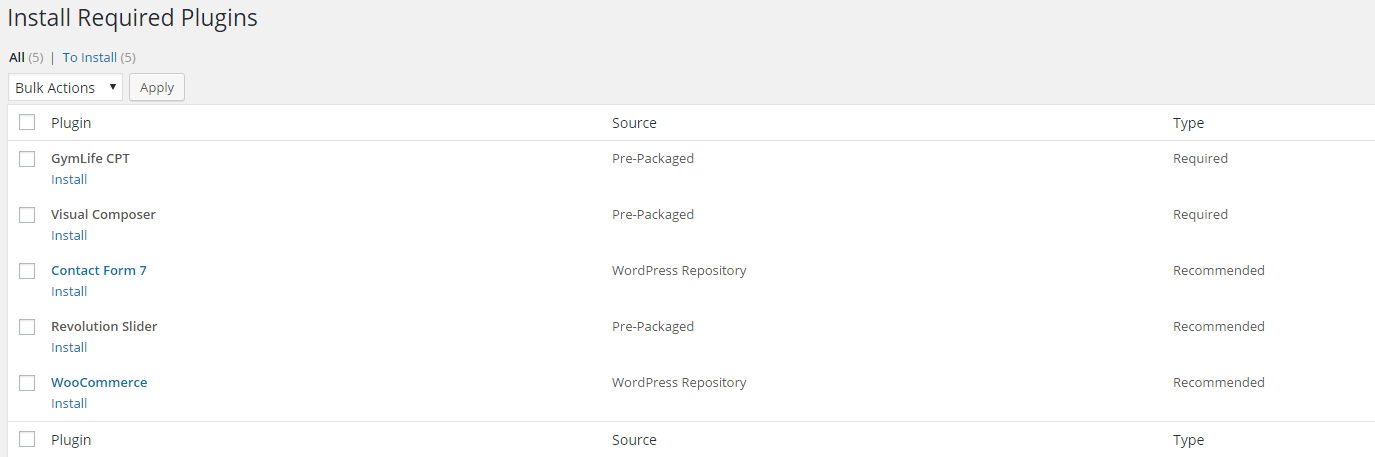
Plugins
After installing the theme you will be presented with a message indicating that the theme requires the Gym Life CPT plugin. You should install this plugin for optimal usage of the theme.
-
To install the Gym Life CPT plugin, first click Begin activating plugins.

-
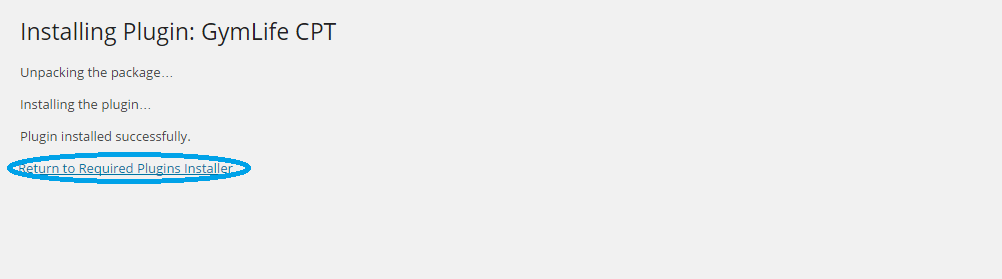
Next Click Install
-
When the installation is finished click Return to Required Plugins Installer
-
Finally, click Activate to complete the installation of the plugin.
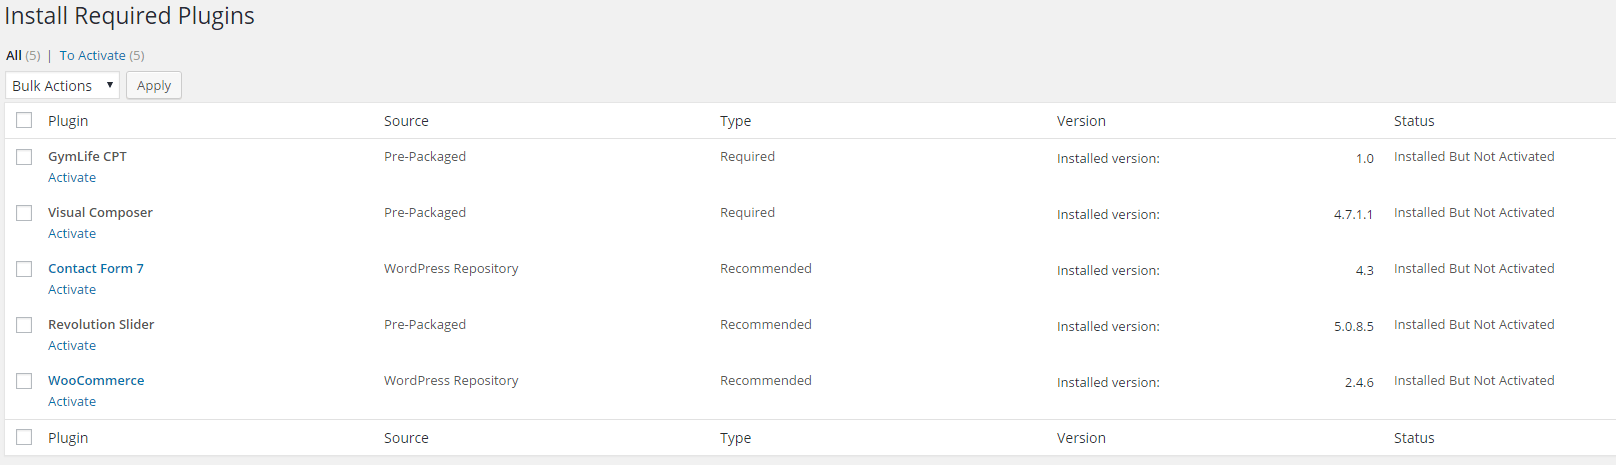
Visual Composer and Revolution Slider have also been bundled with this theme and it is recommended that you install these plugins as well. This can be done by repeating the above steps.
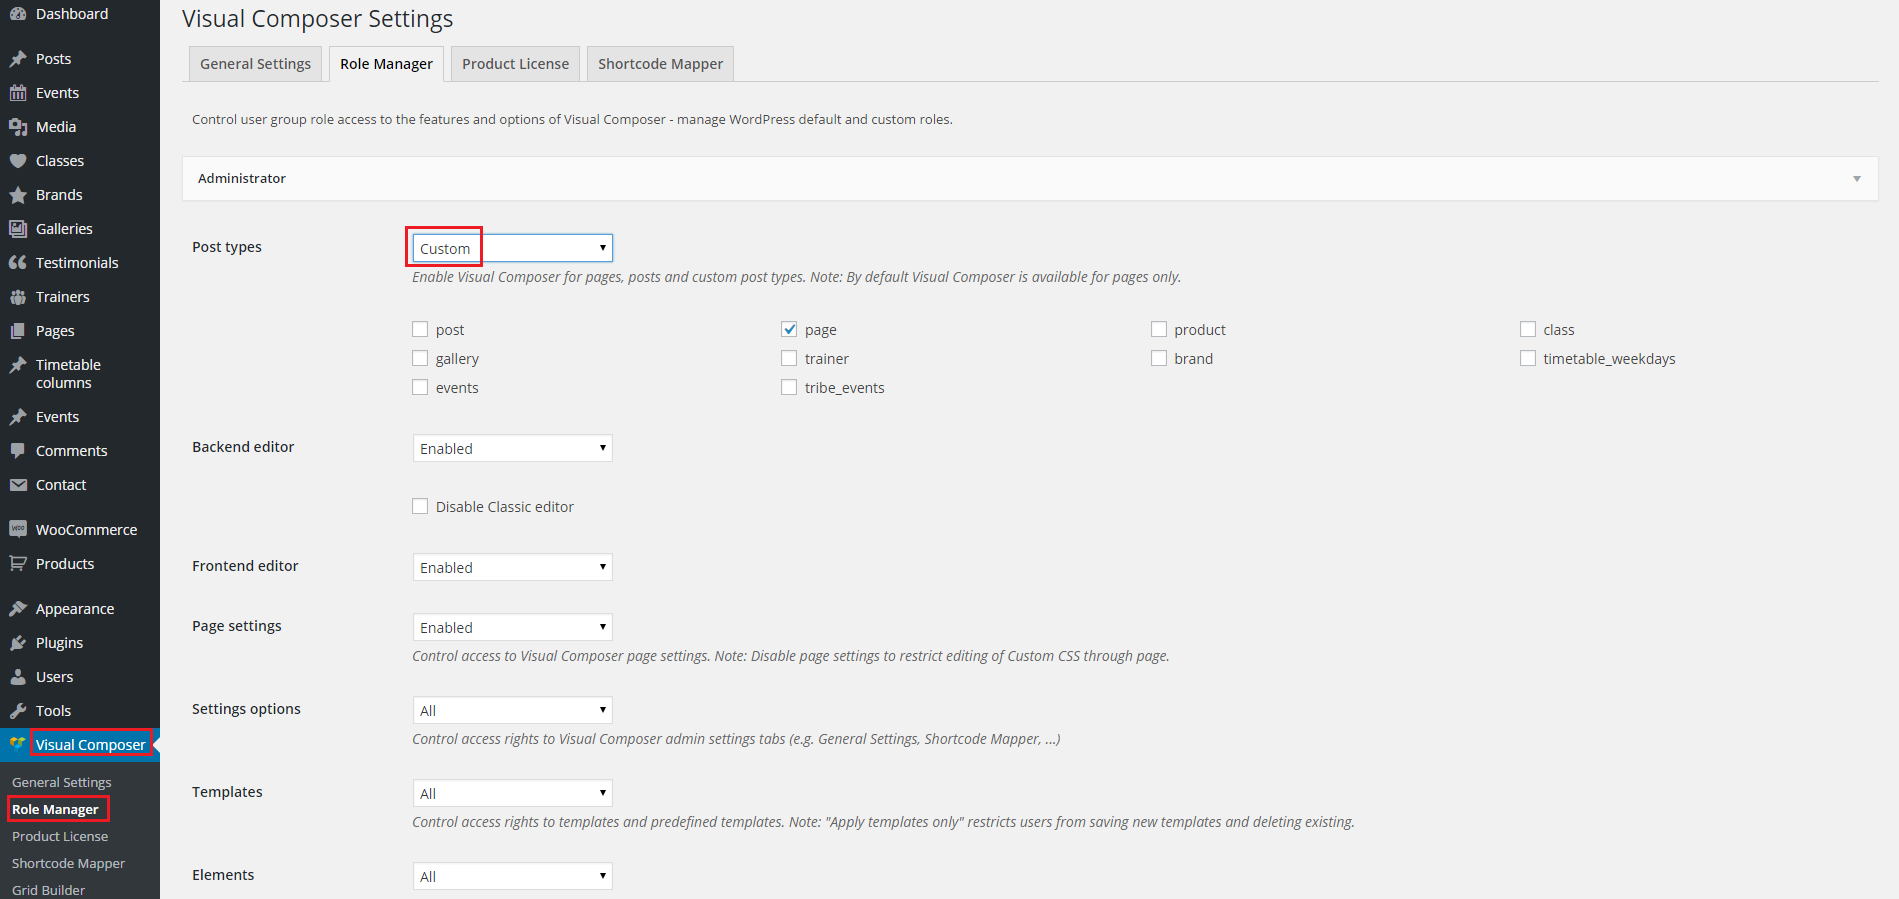
How to enable Visual Composer for additional post types
- From the WordPress dashboard, click Visual Compposer.
- Click the checkbox next to each post type, then click Save Changes.
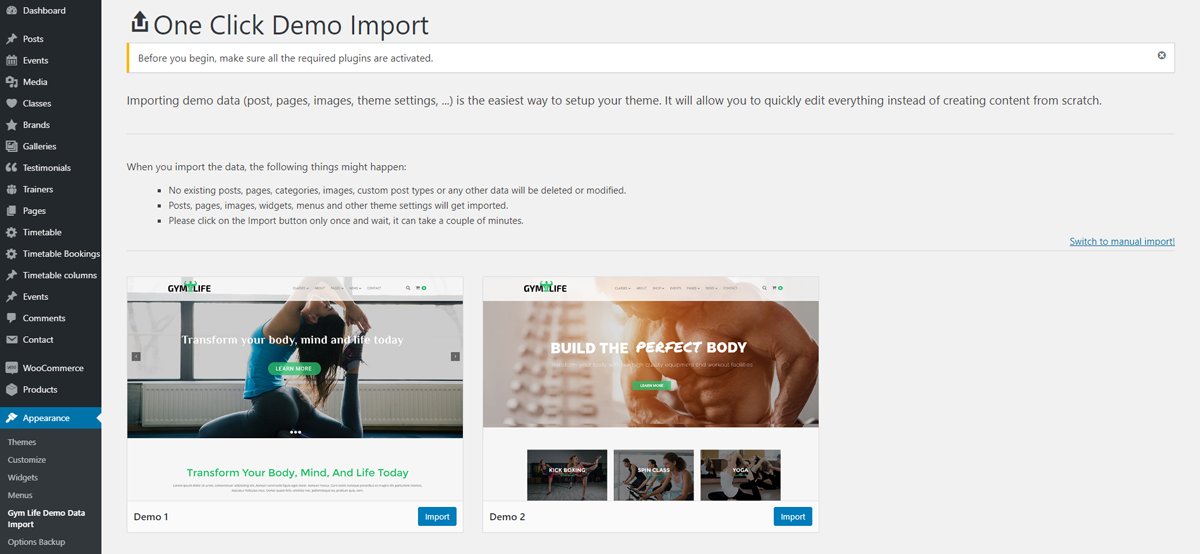
One Click Demo Data Import
- From the WordPress dashboard, click Appearance -> Import Demo Data.
-
Next click Import to import the demo content.
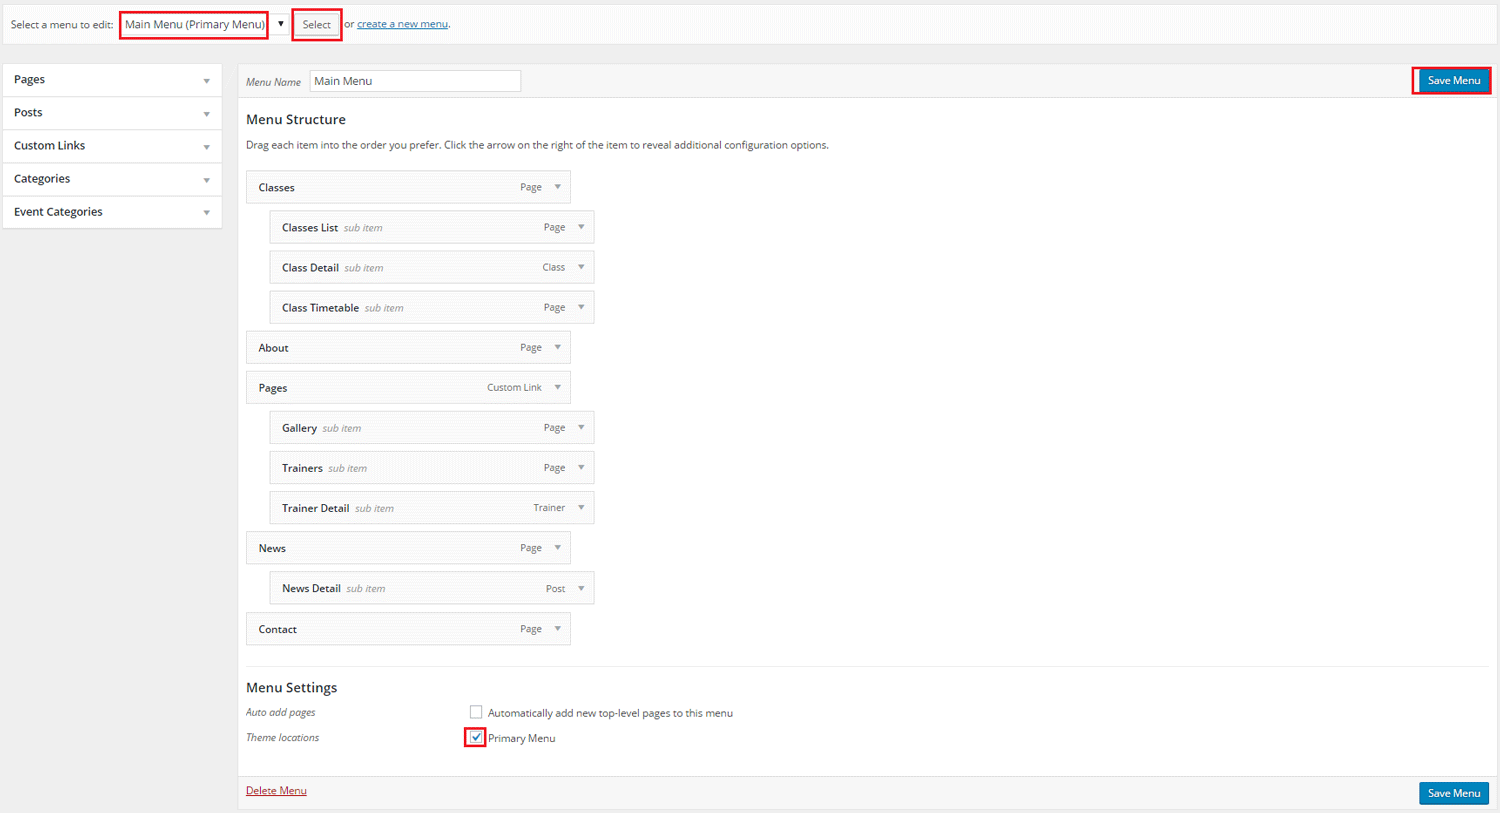
How to set-up Main Menu
- From the WordPress dashboard, click Appearance -> Menus
- Select Main Menu from the dropdown (see below) then click Select.
- Reorder the menu items as needed.
-
Click the checkbox next to Primary Menu then click Save Menu.
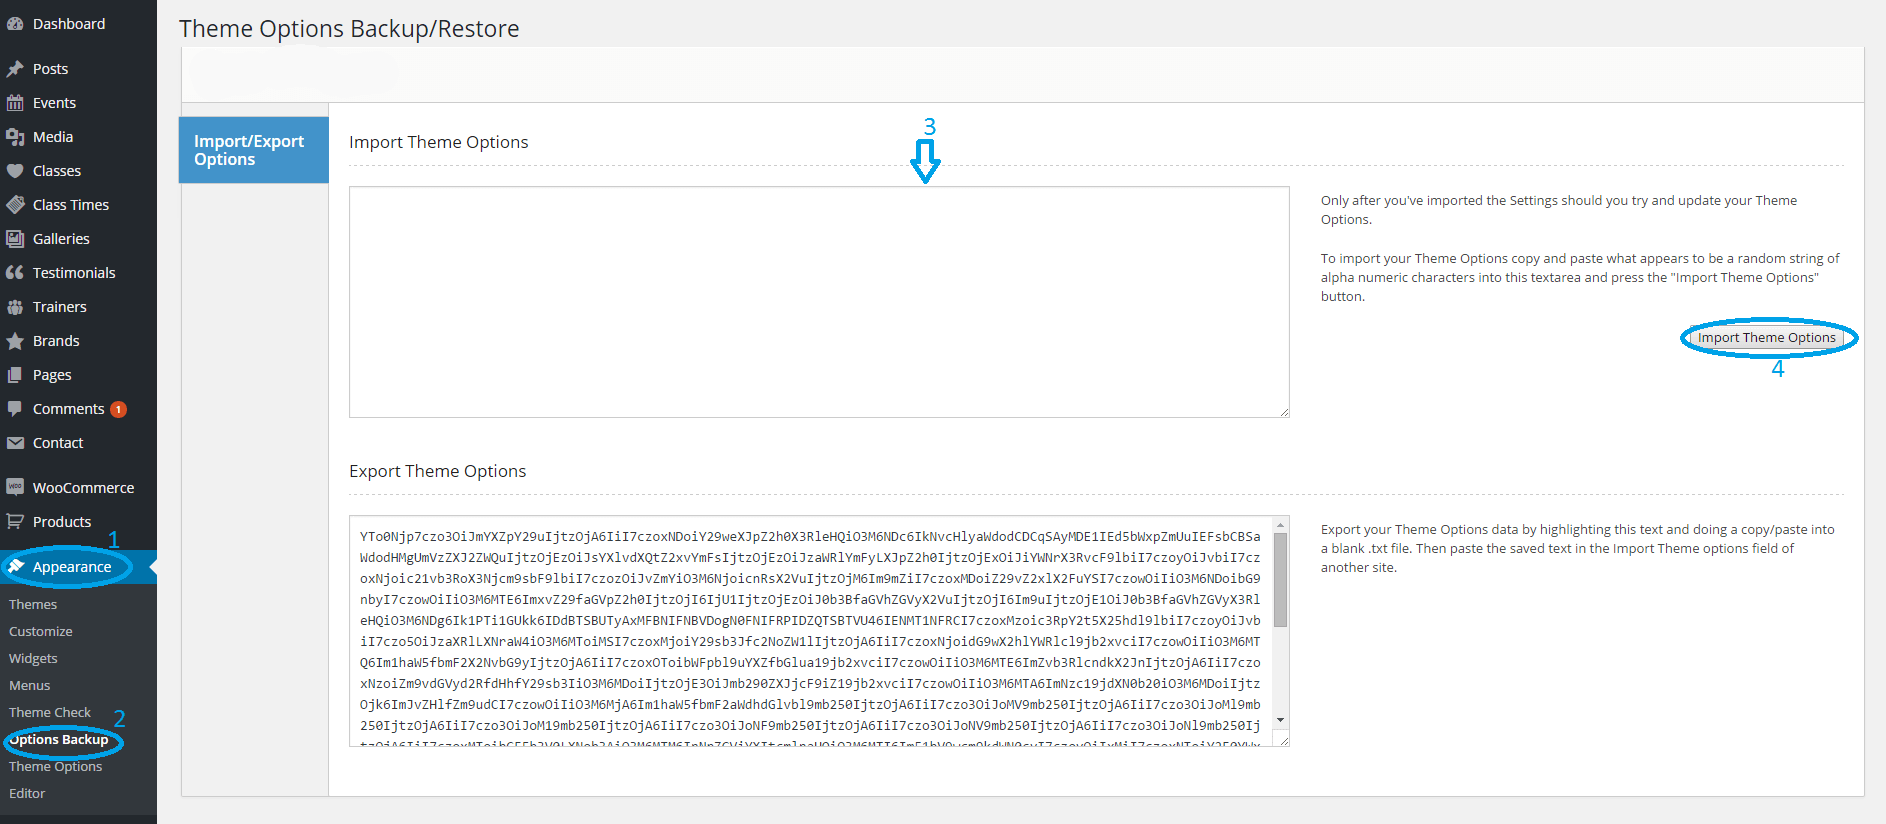
How to import Theme Options
- From the WordPress dashboard, click Appearance -> Options Backup
- You will be presented with a screen similar to the one below.
- Open the themeoptions.txt file included with the theme and copy and paste its contents into the field provided.
-
Next click Import Theme Options to finish.
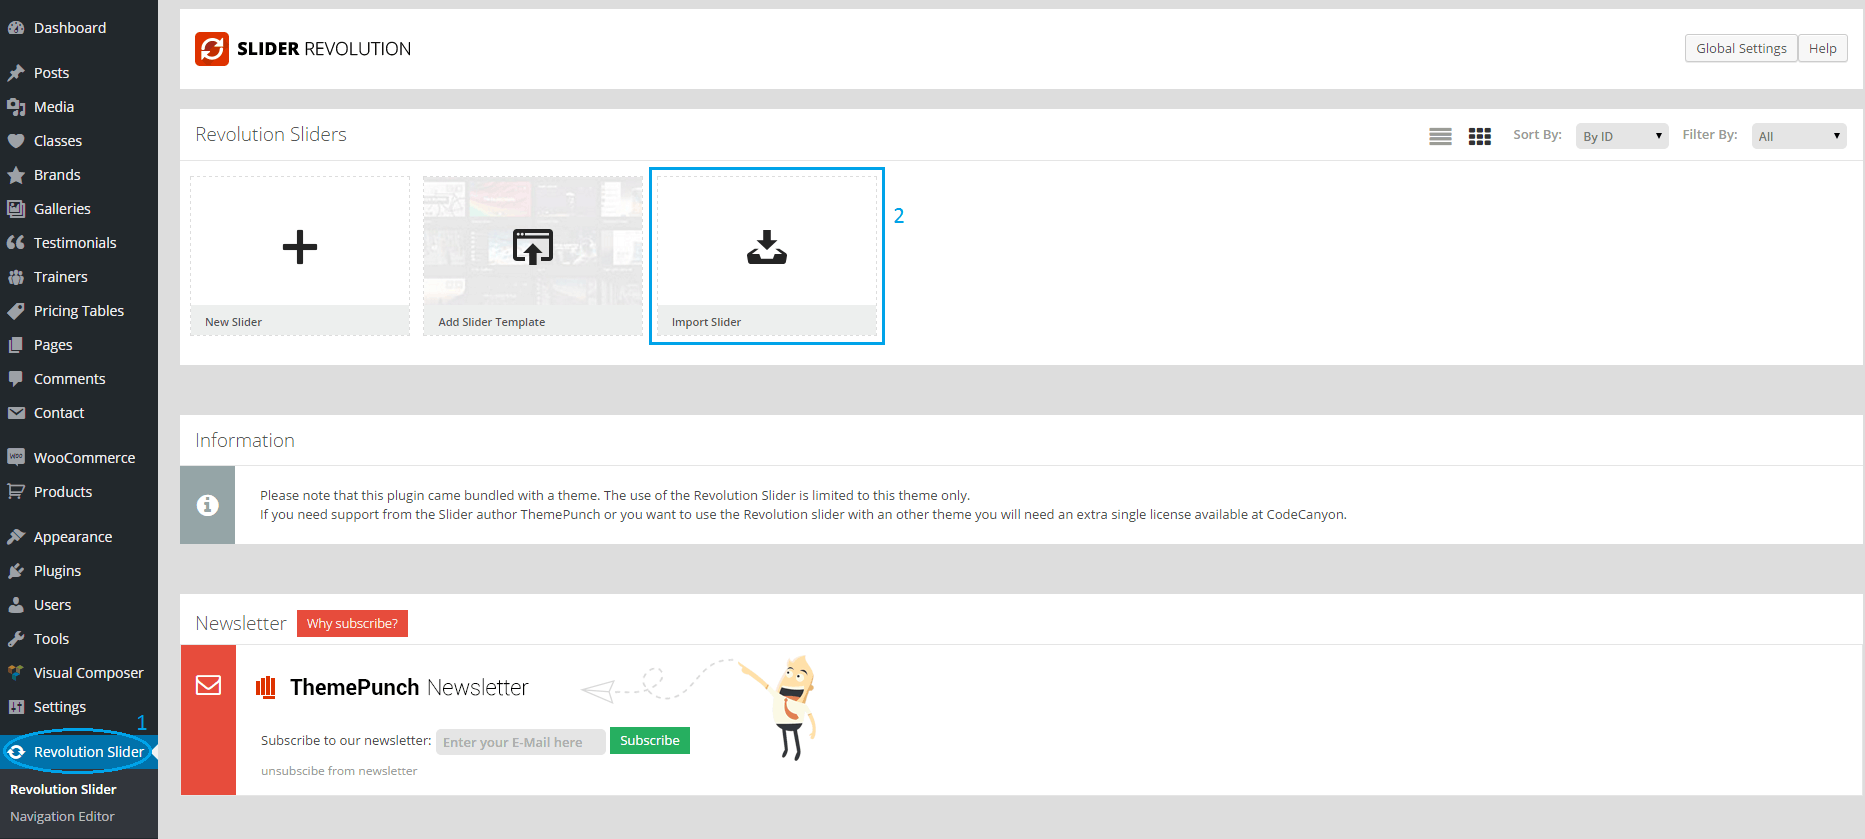
Revolution Slider Data Import
- From the WordPress dashboard, click Revolution Slider.
-
Next click Import Slider.
- You will be presented with a screen similar to the one below. Click Choose File then navigate to the Revolution Slider file in the Sample Data folder.
- After choosing the slider file click Import Slider then wait until the import is finished.

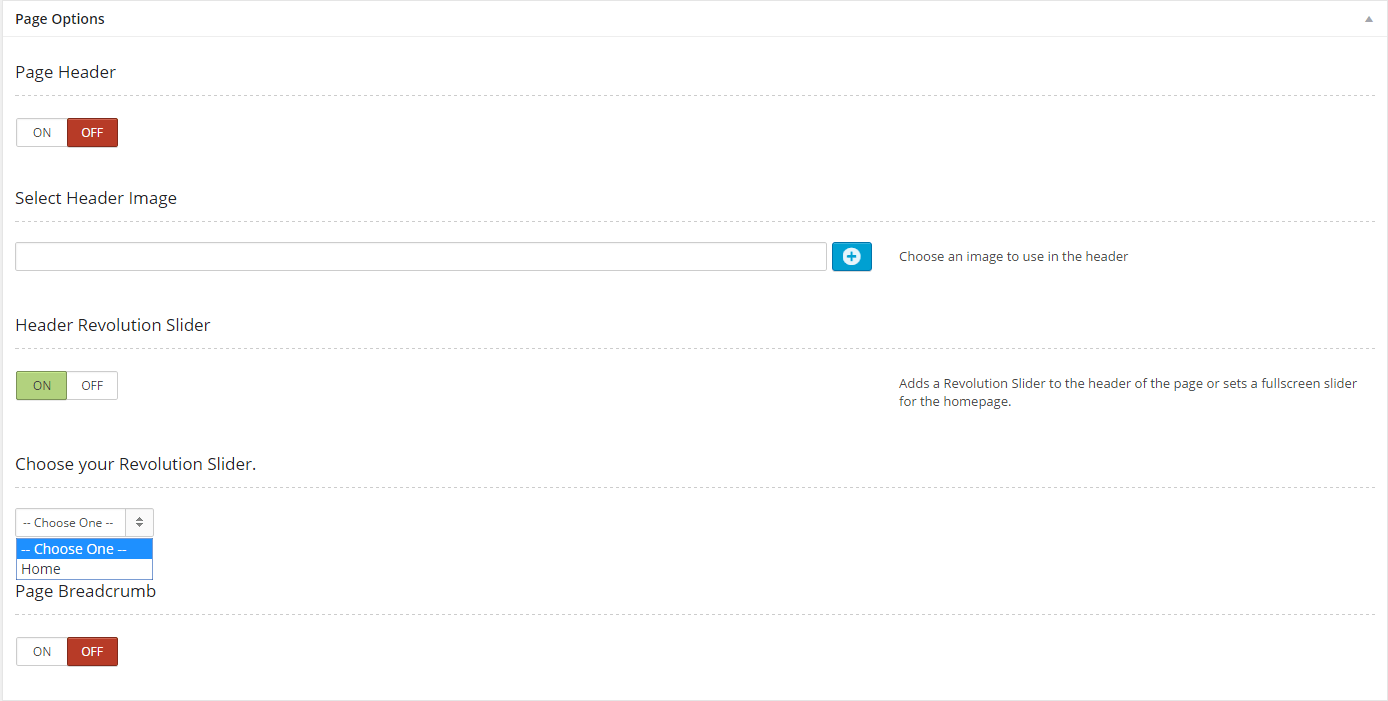
- If you wish to add the slider to the header of a page or use it on the home page. Go to the Page Options make sure Header Revolution Slider is set to ON then choose the slider.
Post Types
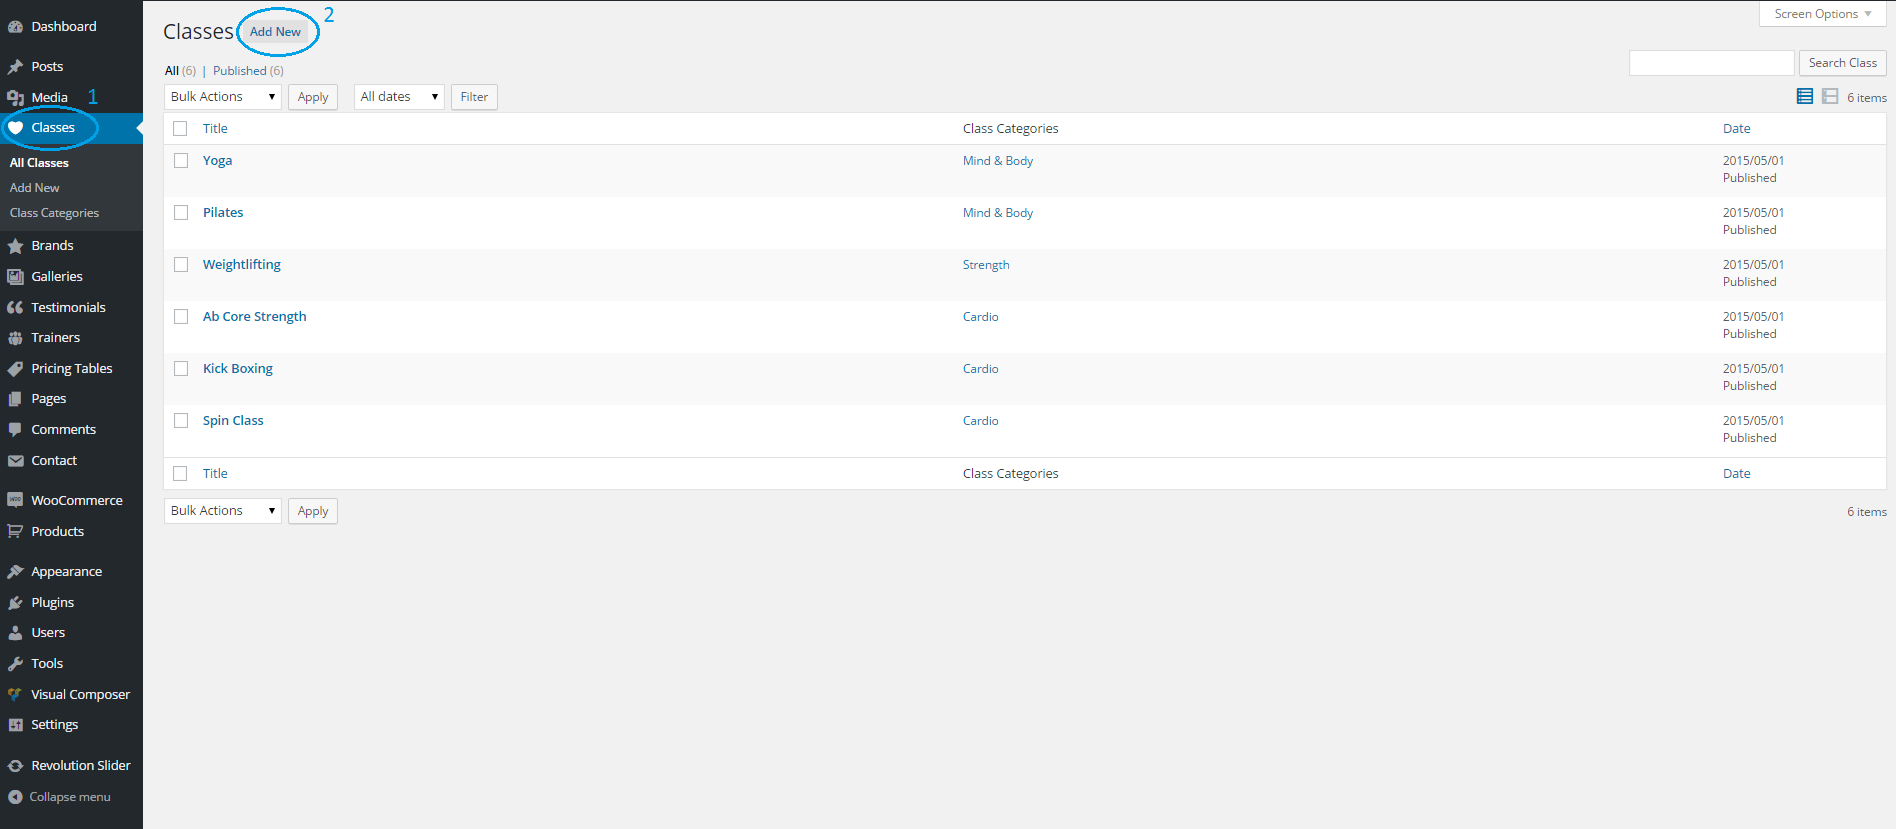
How to add a class
- From the WordPress dashboard, click Classes
-
Next Click Add New.
-
Next you will be presented with a screen similar to the one below. Fill out all the relevant information for the class.
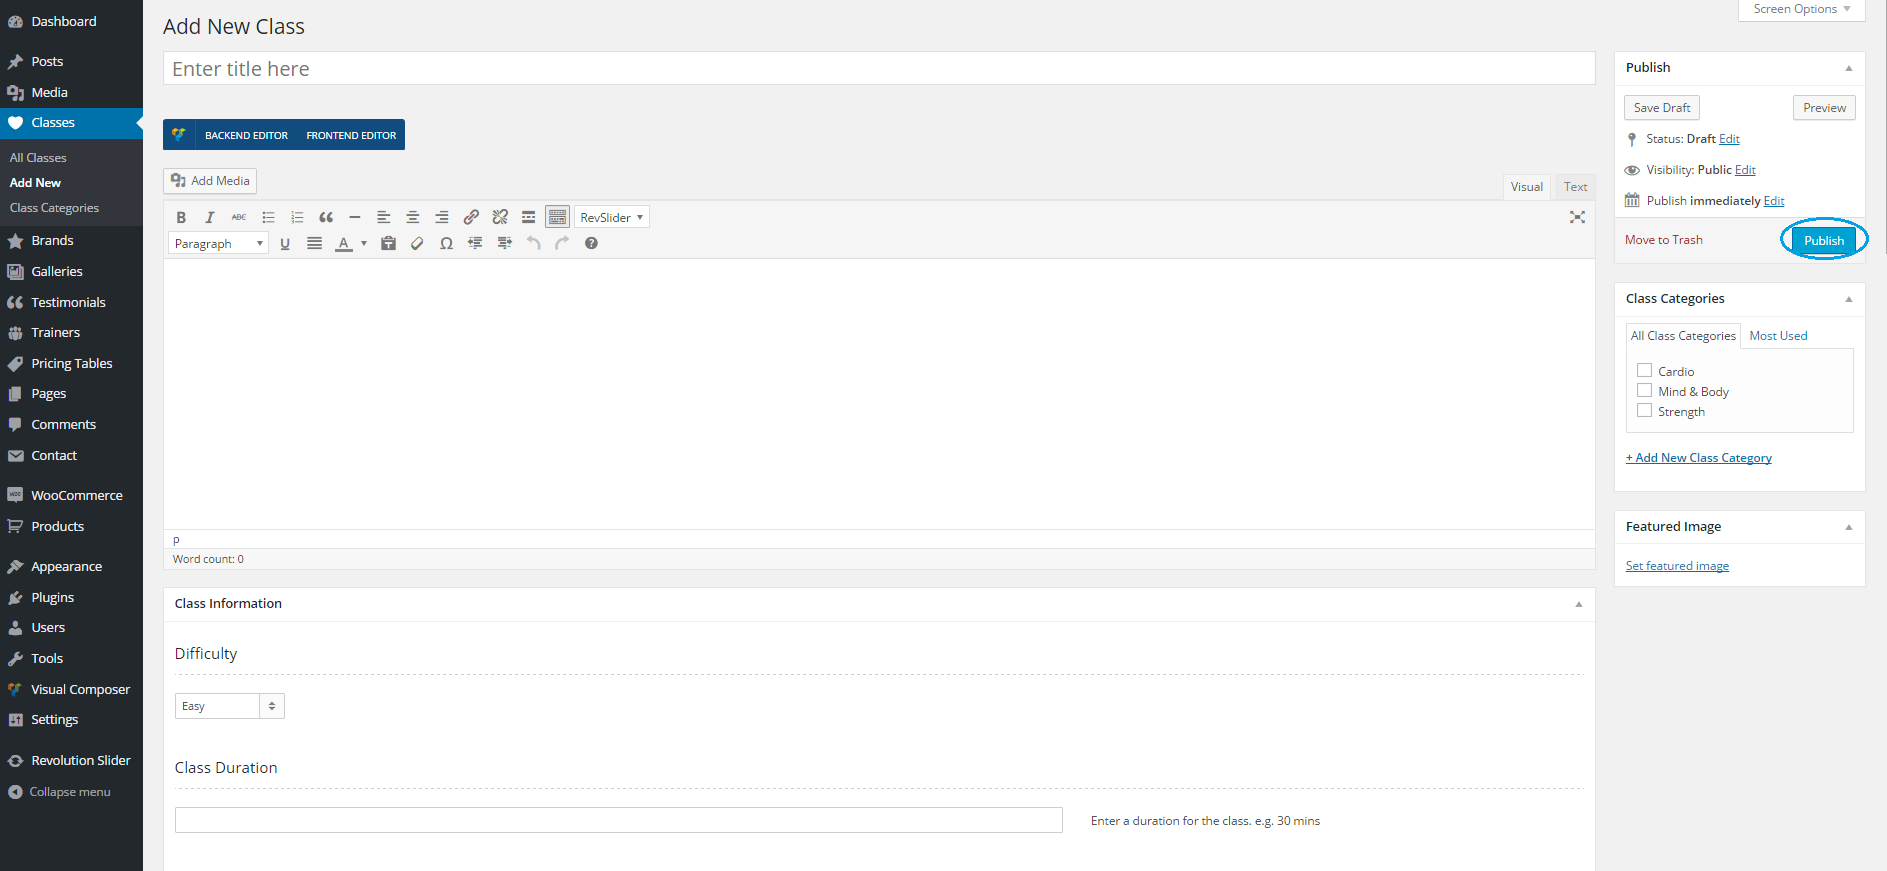
- After all the information is entered click Publish.
-
Next you will need to create a page to display the classes. To do this click Pages from the WordPress dashboard, then click Add New.
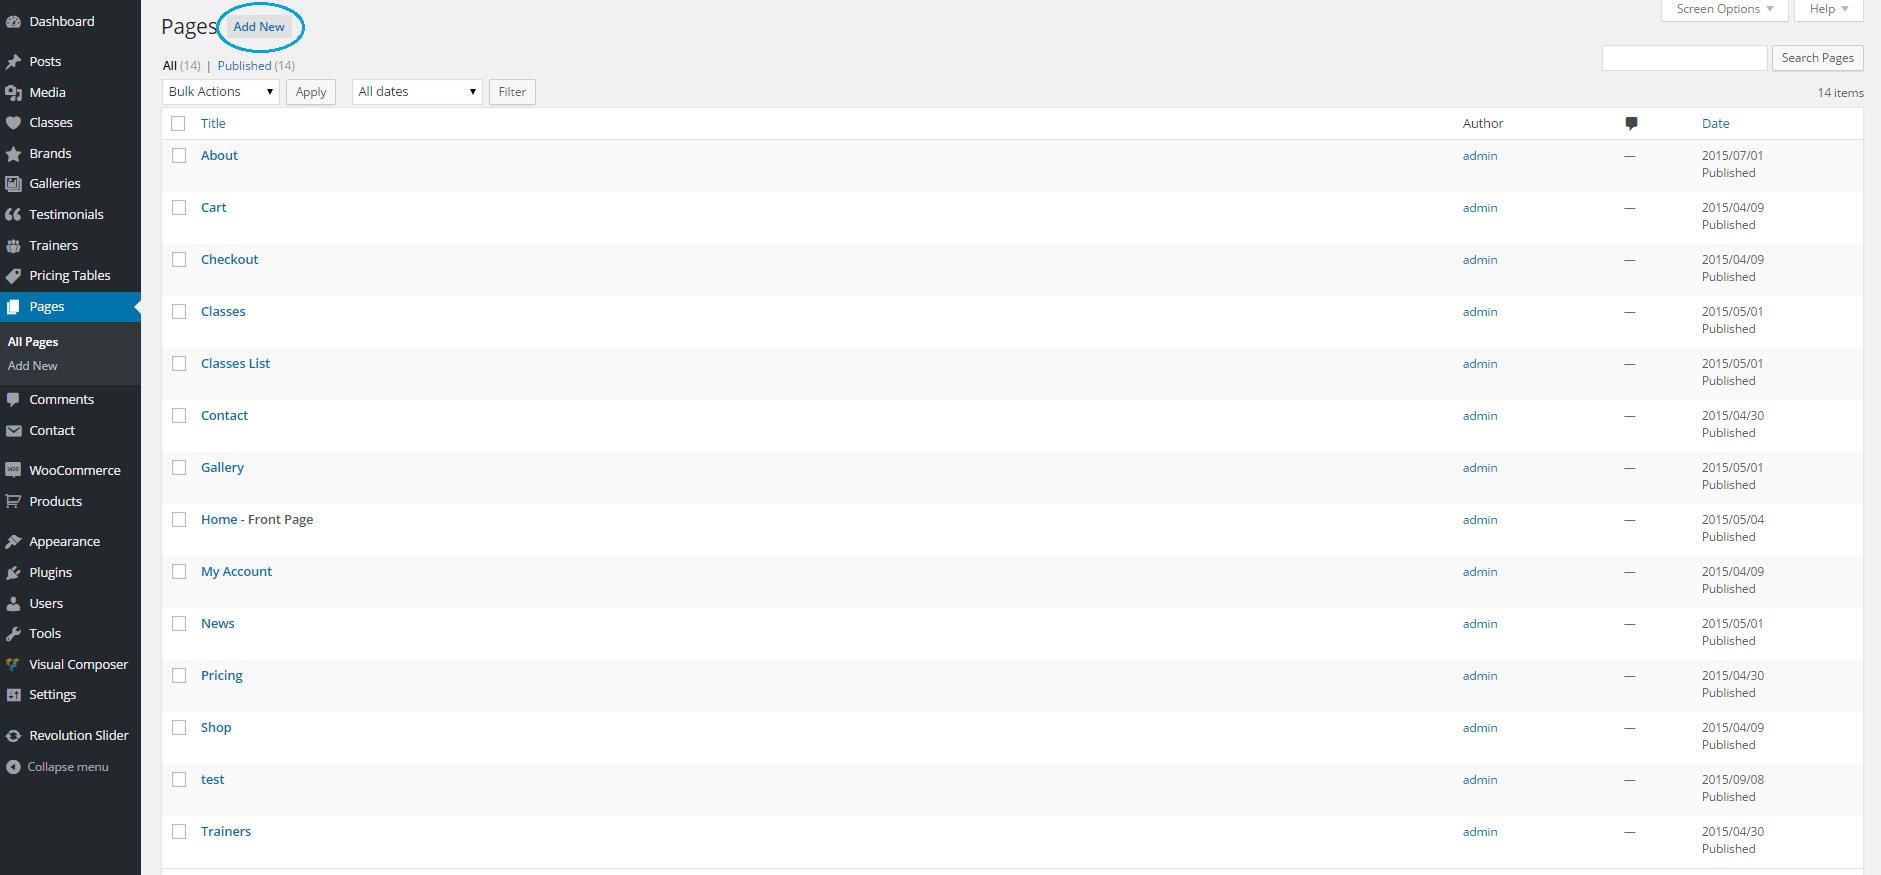
- Give the page a name then you will need to select a Page Template for the Classes page.
-
After choosing a page template click Publish to finish.

How to add a gallery
- From the WordPress dashboard, click Galleries.
- Next Click Add New.
-
You will be presented with a screen similar to the one below.
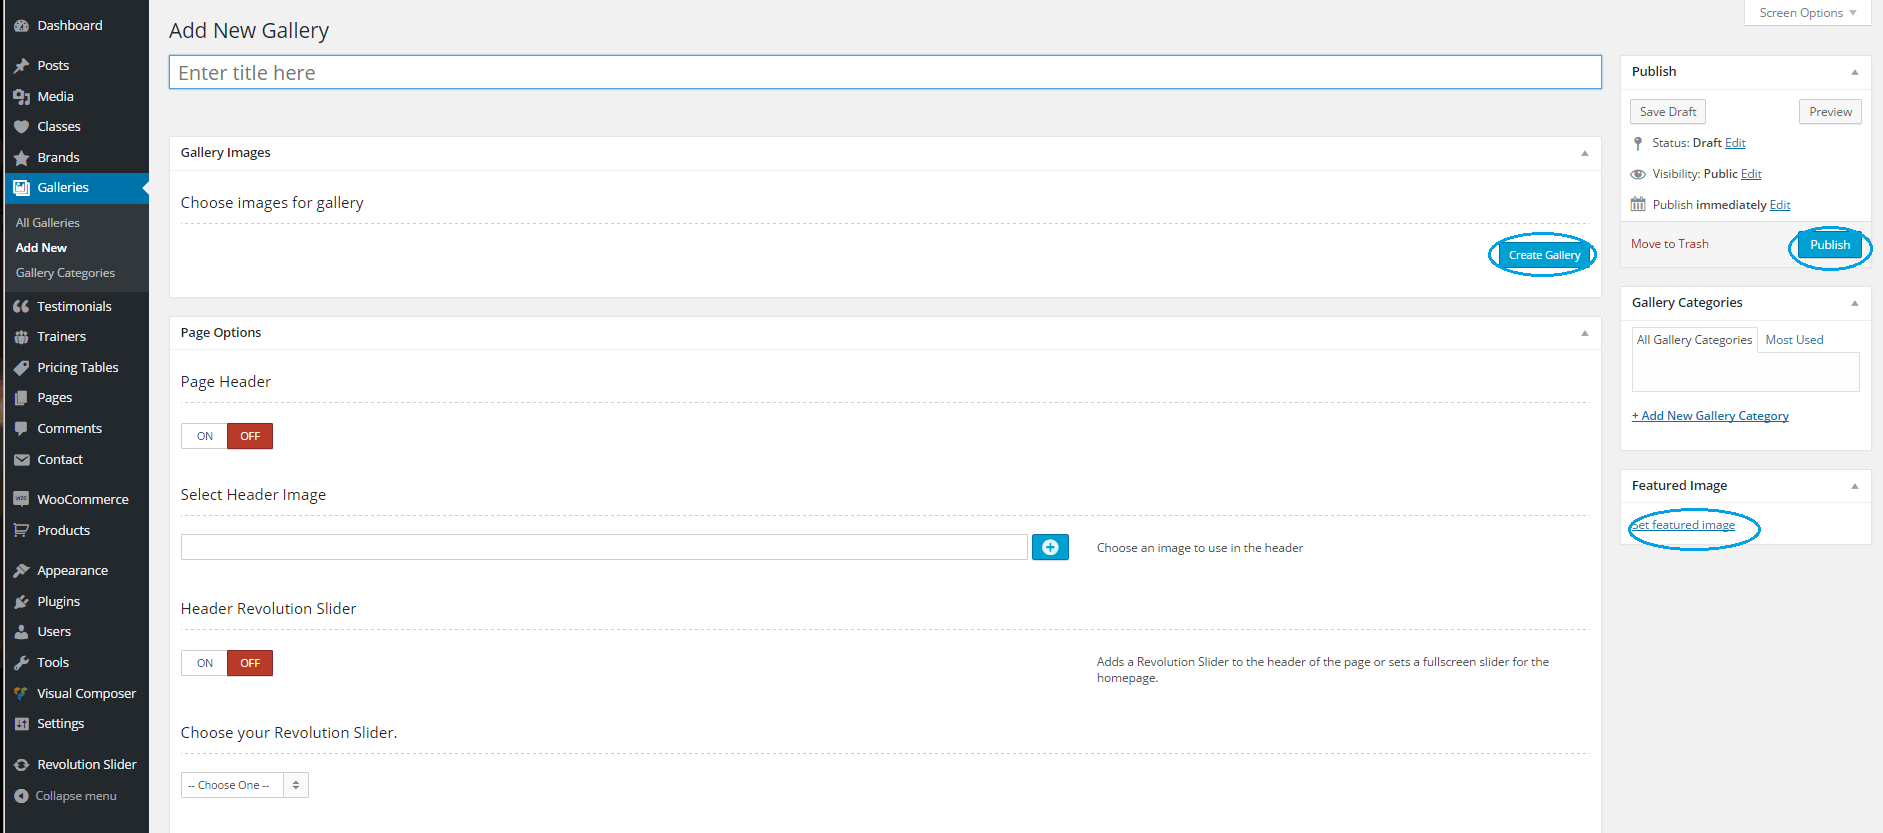
- Click Set Featured image to set a thumbnail for the gallery
- Go to the section titled Gallery Images and click Create Gallery.
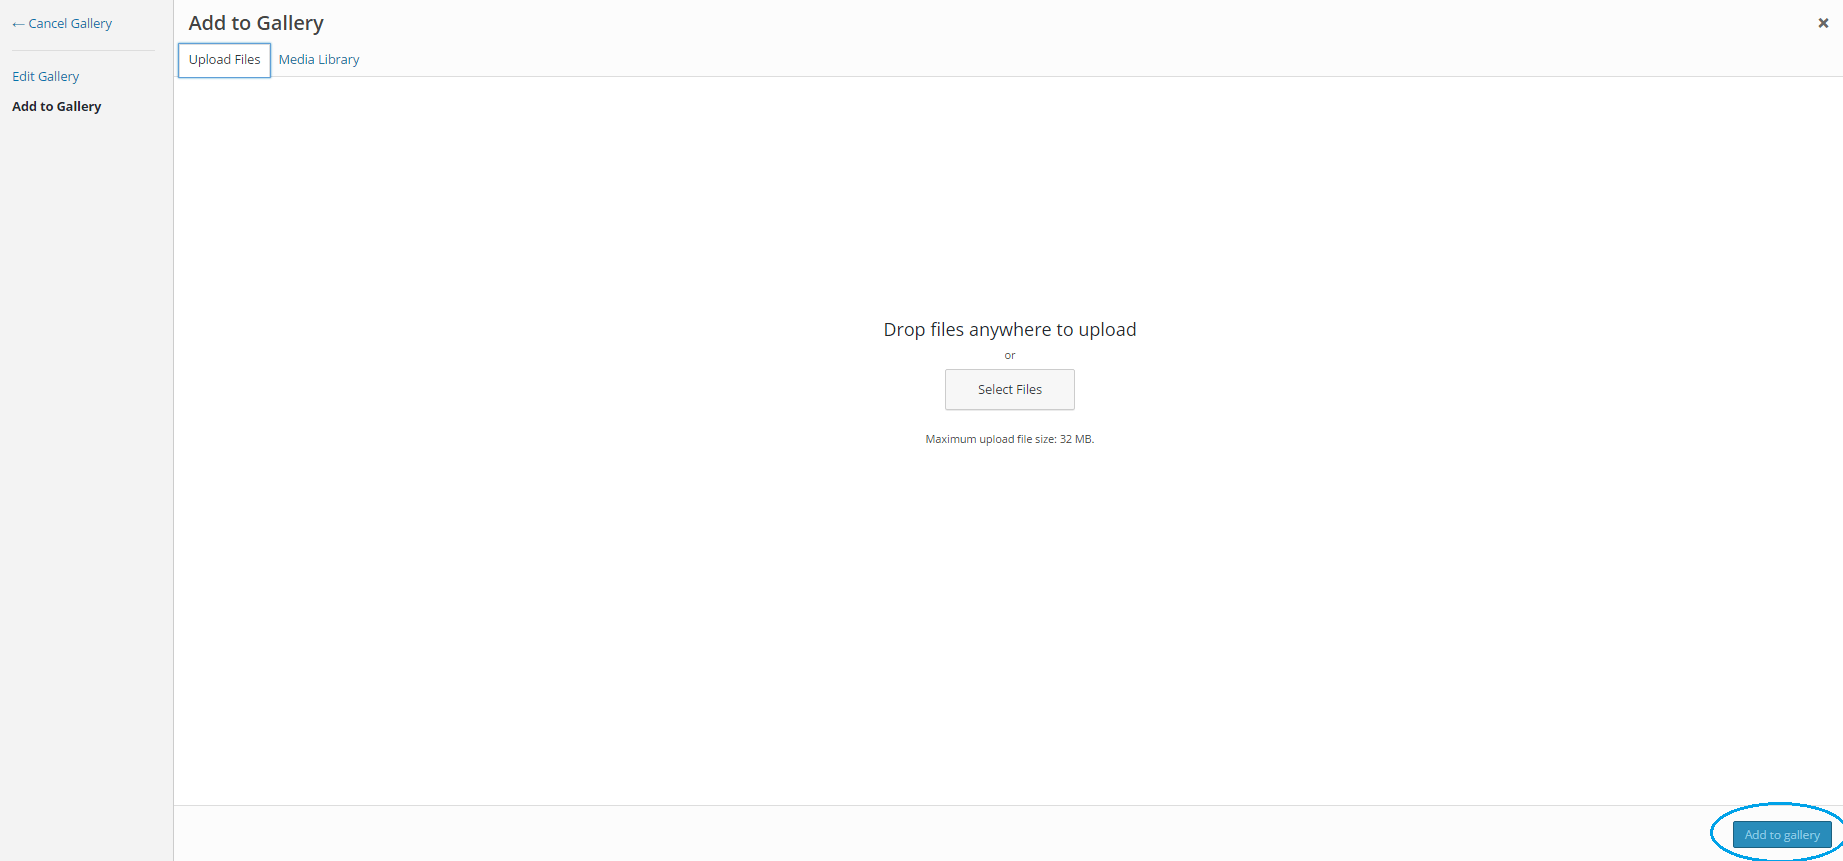
- You will then be presented with a WordPress Gallery/Media uploader.
-
Add your images to the gallery then click Add to Gallery.
- When finished click Publish to create the gallery.
- Next you will need to create a page to display the gallery. To do this click Pages from the WordPress dashboard, then click Add New.
- Give the page a name then you will need to select the Page Template called Gallery page.
- After choosing the page template click Publish to finish.
Theme Customization
Gym Life features a powerful admin panel that allows you to make a number of customizations to the theme. Each customization has description next to it explaining what it does; however we will touch some of the more important customizations you may want to make here in this manual.
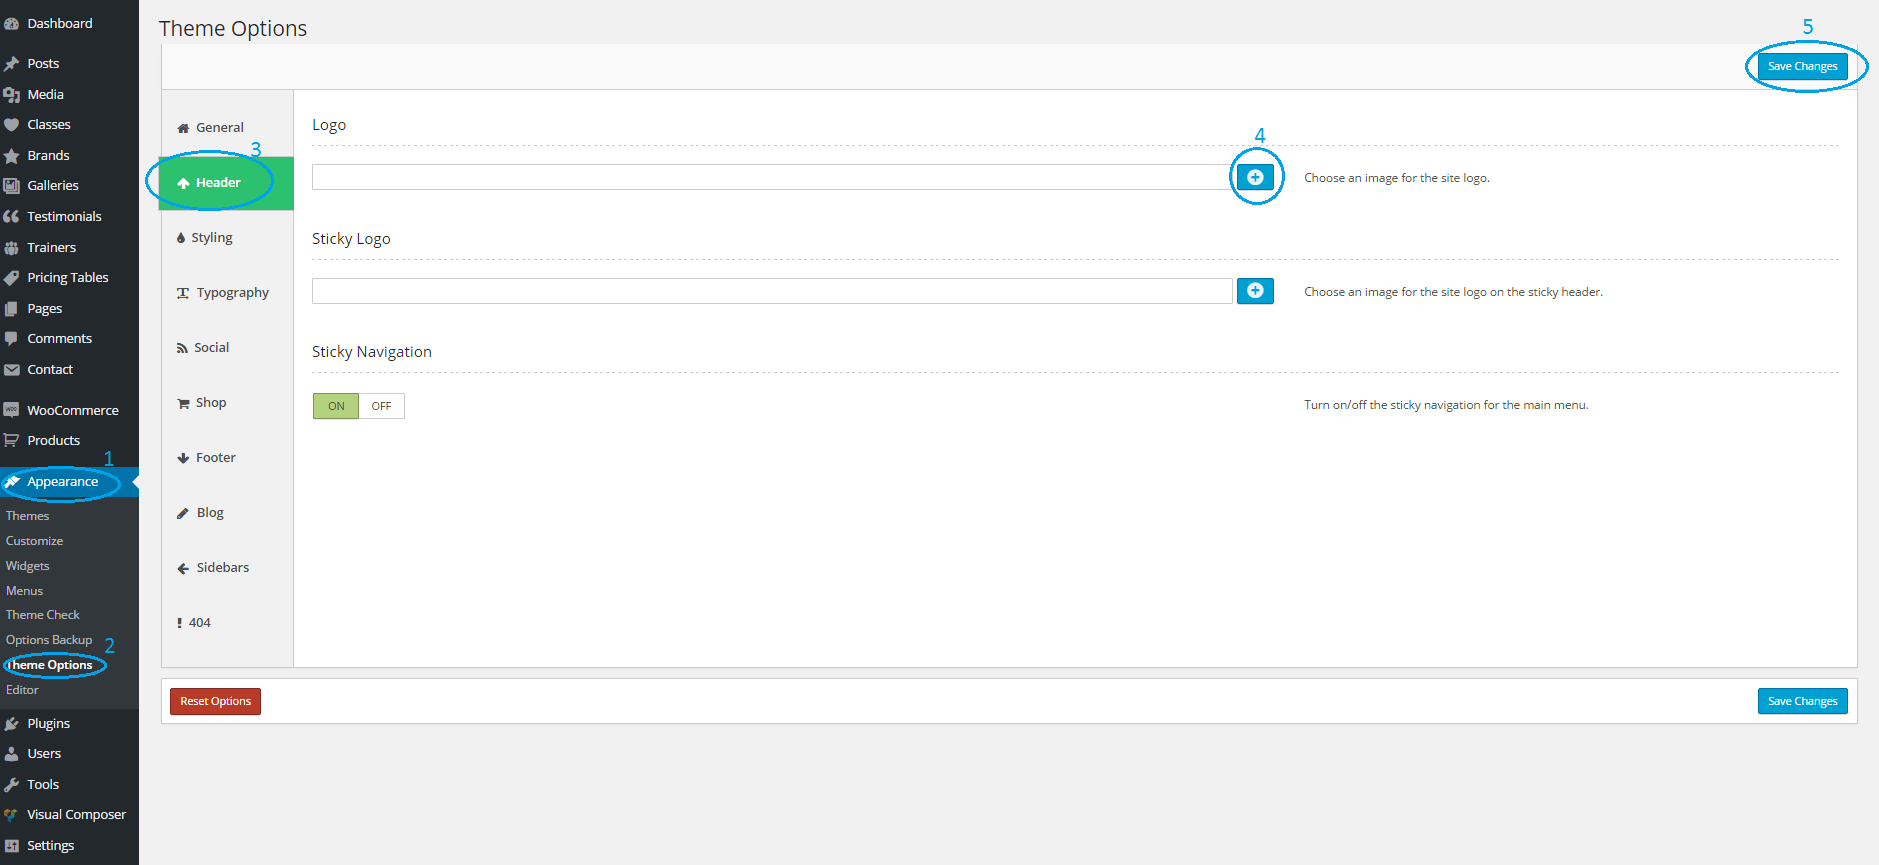
How to add a logo
- By default Gym Life will use your site title as the logo but you can change this by following the steps below.
- From the WordPress dashboard, click Appearance -> Theme Options.
- Next click Header from the menu on the left. (Step #3 in the picture below)
- Then click the blue button in the field below the Logo heading. (Step #4)
- Choose your logo from the media gallery or drag and drop it onto the media library.
- After choosing the logo click Send to Option Tree.
-
With the logo added click Save Changes to finish.
How to add social icons in footer
- From the WordPress dashboard, click Appearance -> Theme Options.
- Next click Social from the menu on the left. (Step #3 in the picture below)
-
Under the Social Menu in header section click Add New. (Step #4 in the picture below)
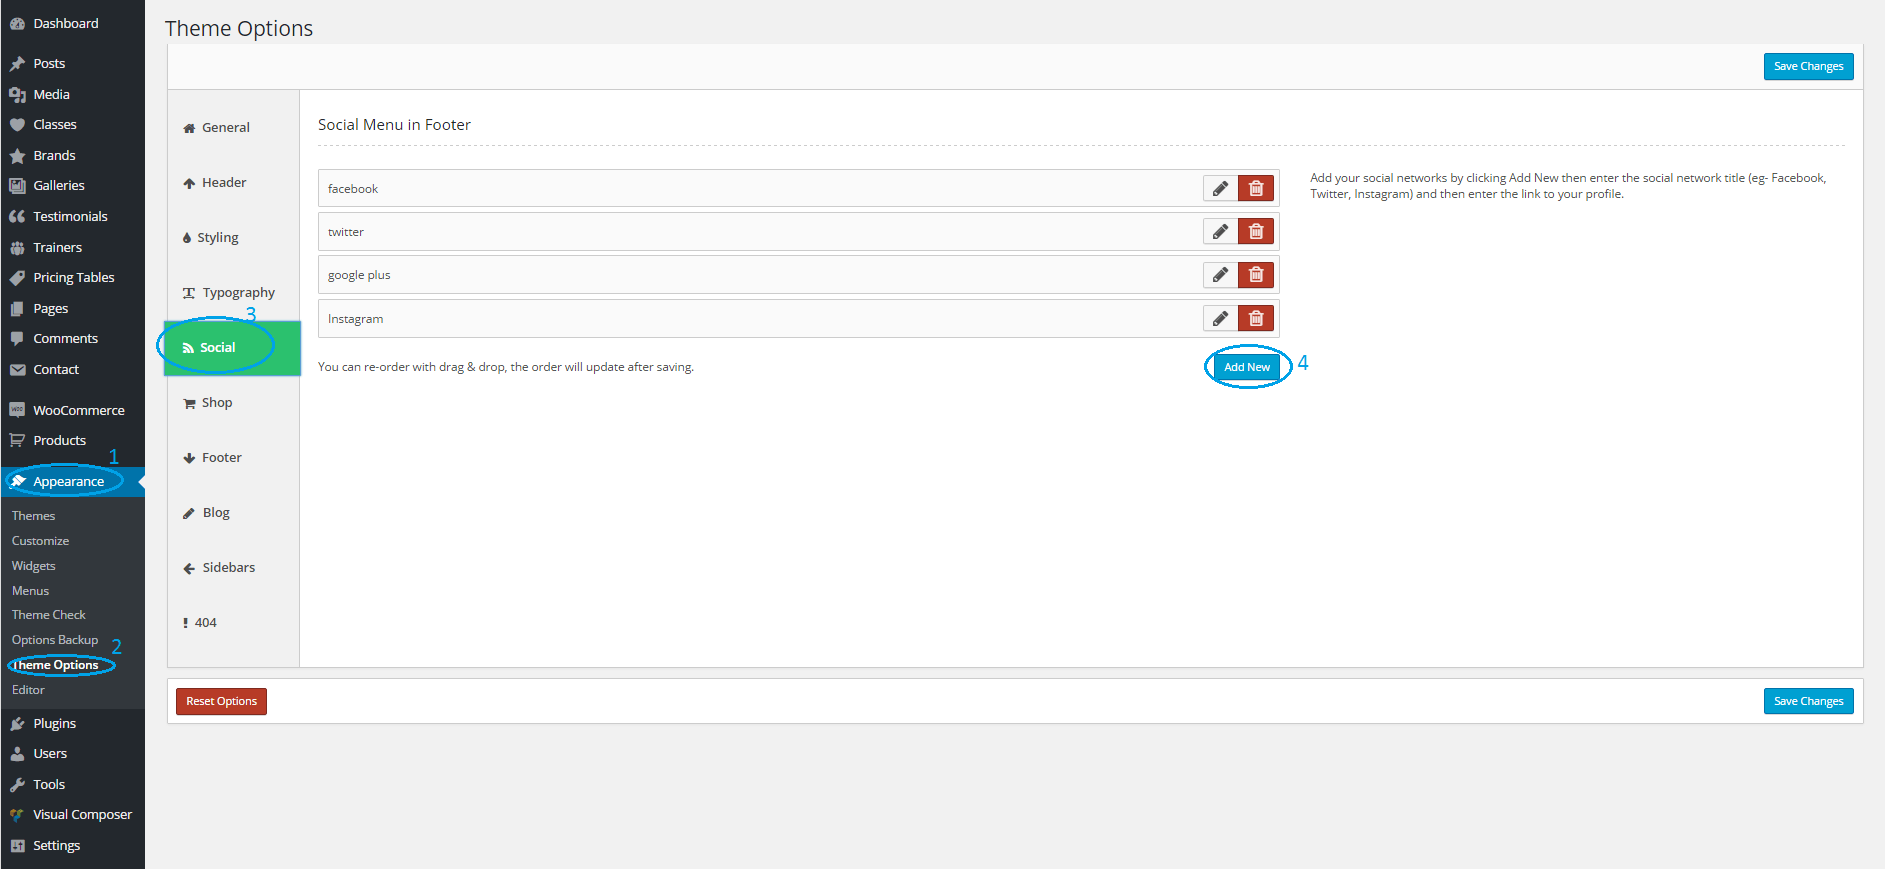
- This will display two fields called Title and Link URL. In the Title field type the name of the social network you want to enter e.g. (Facebook, Twitter, Instagram). In the link URL field type the link to your page on the social network.
- To add another social network click Add New and repeat step 4.
-
To edit the information for a saved social network click the grey pencil icon (see step #4 in second picture below) or to delete a saved social network click the red trash can icon. (step #5 in the second picture below).
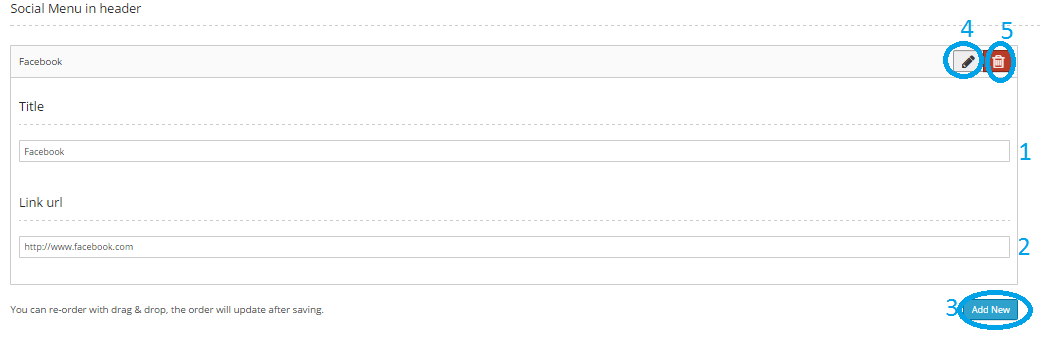
- When you have finished entering all of your social networks click Save Changes to finish.
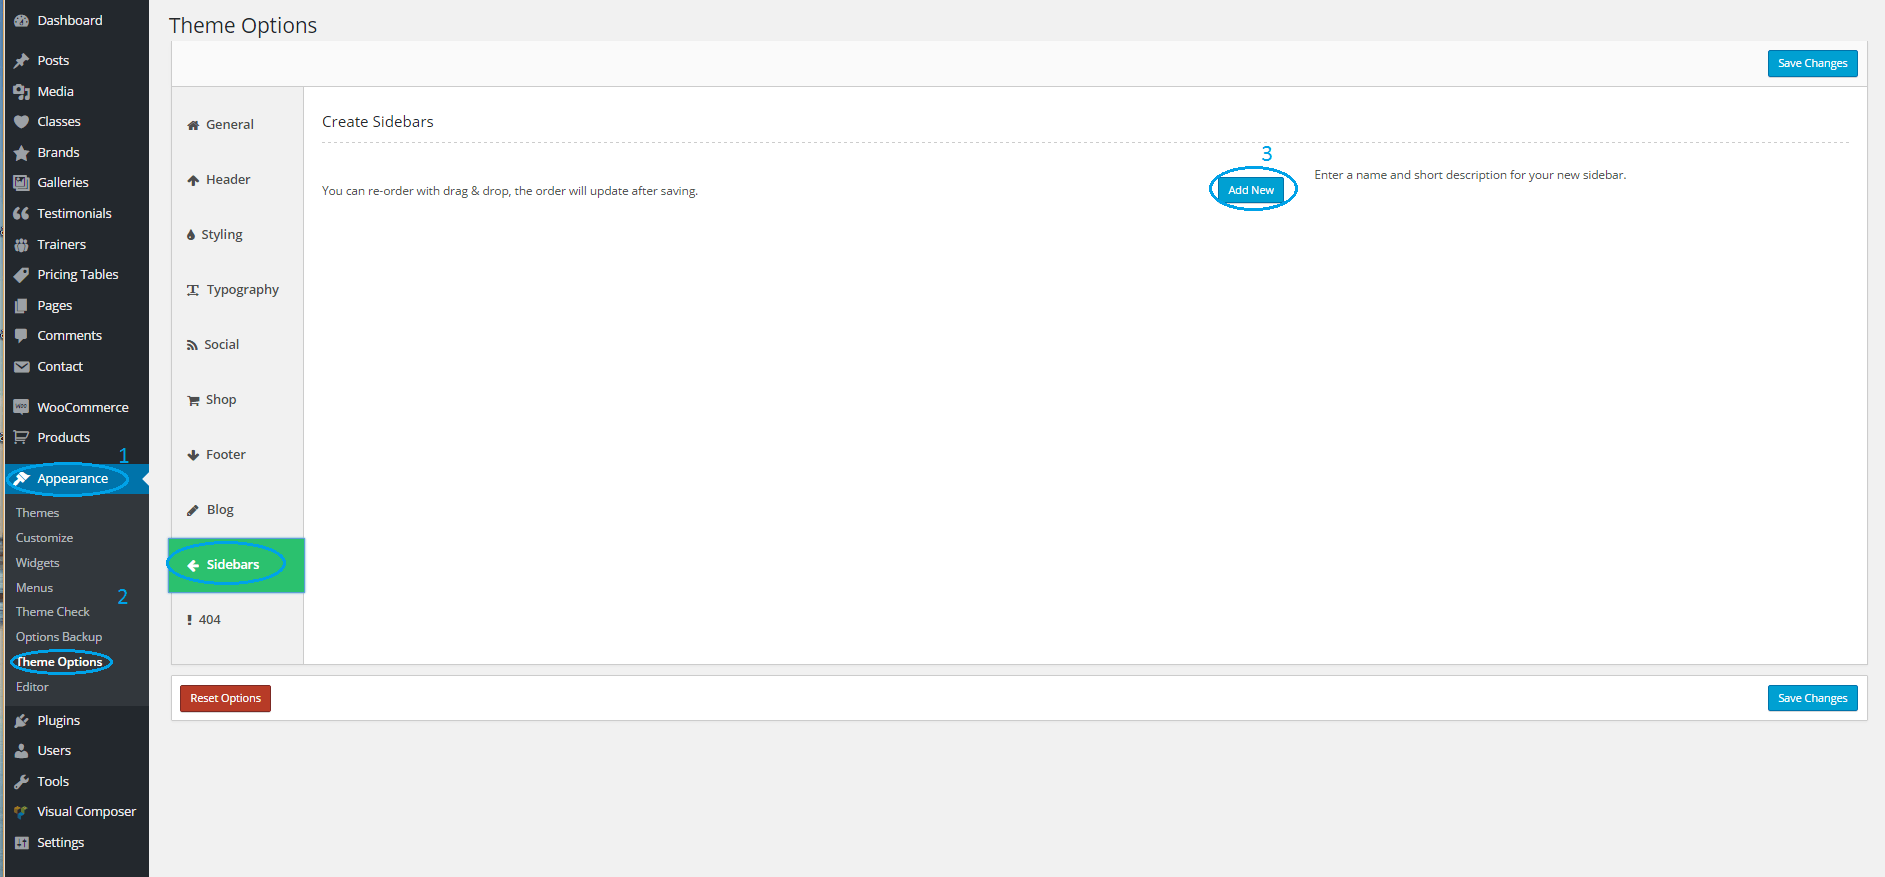
How to create a new sidebar
- From the WordPress dashboard, click Appearance -> Theme Options.
- Next click Sidebars from the menu on the left.
-
Click Add New and this will display a screen that will allow you to setup your new sidebar with all the necessary information.
- To add another sidebar repeat step 3.
-
To edit the information for a saved sidebar click the grey pencil icon (see step #4 in second picture below) or to delete a saved sidebar click the red trash can icon. (step #5 in the second picture below).
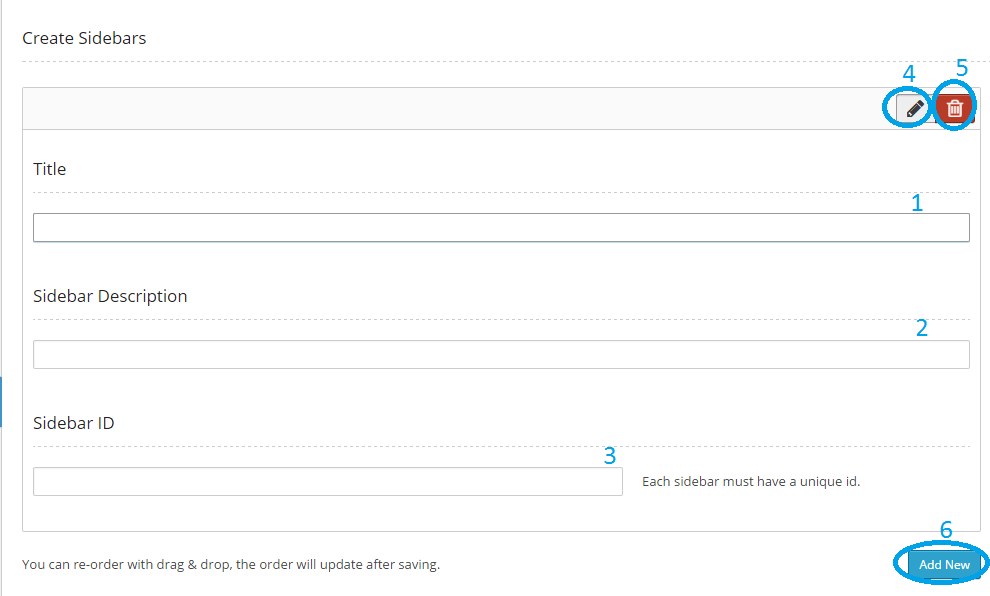
- When you have finished entering all of your sidebars click Save Changes to finish.
Localization
This theme is localization ready and can be translated into many languages using the included .po/.mo files. These translation files can be found in the languages folder inside the theme folder. To translate these files you will need a translation editor such as Poedit http://www.poedit.net/ .
Using Poedit to translate the theme.
- Visit http://poedit.net/download to download a copy of Poedit for your system and install it.
- Run Poedit and click Create new translation.

- Navigate to the download package and go to gym-life/languages. Click on either the default.po or default.pot file.
- Choose the language you wish to translate the theme to.
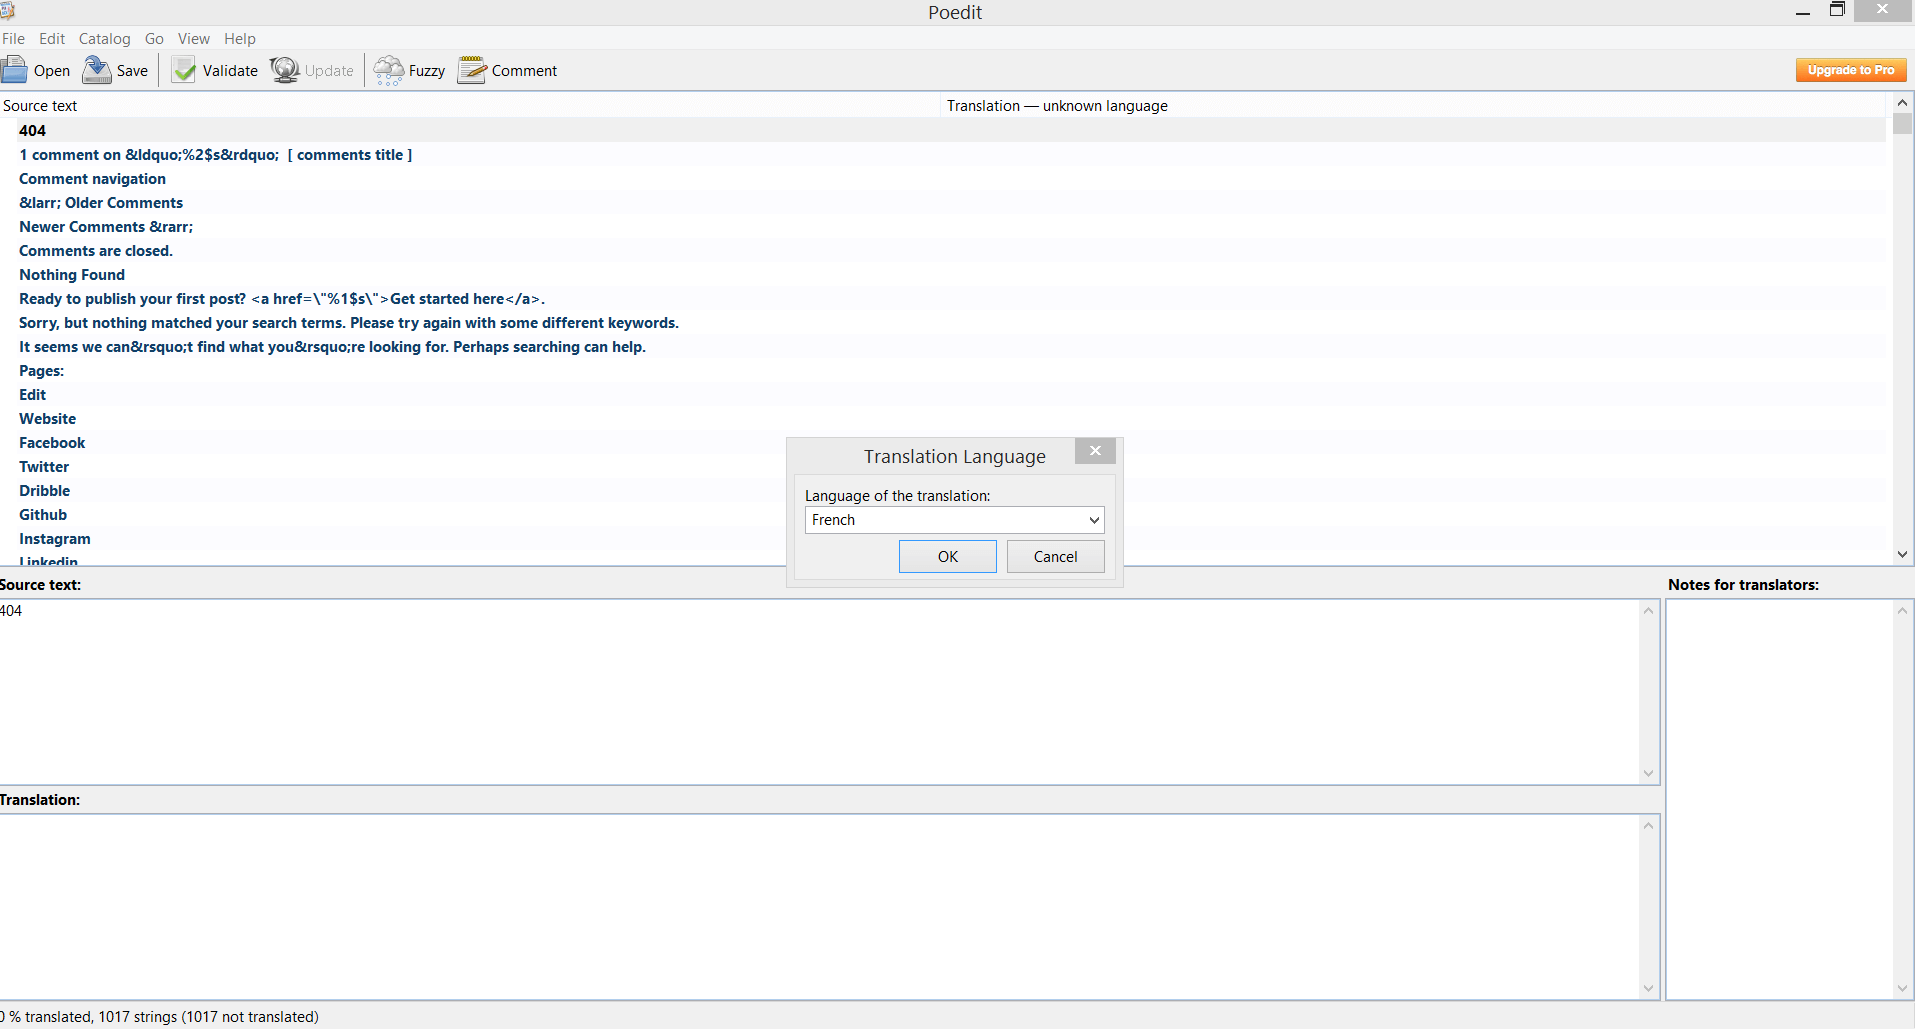
- Click on each row of text to highlight the untranslated text and enter the translated text in the Translation field.
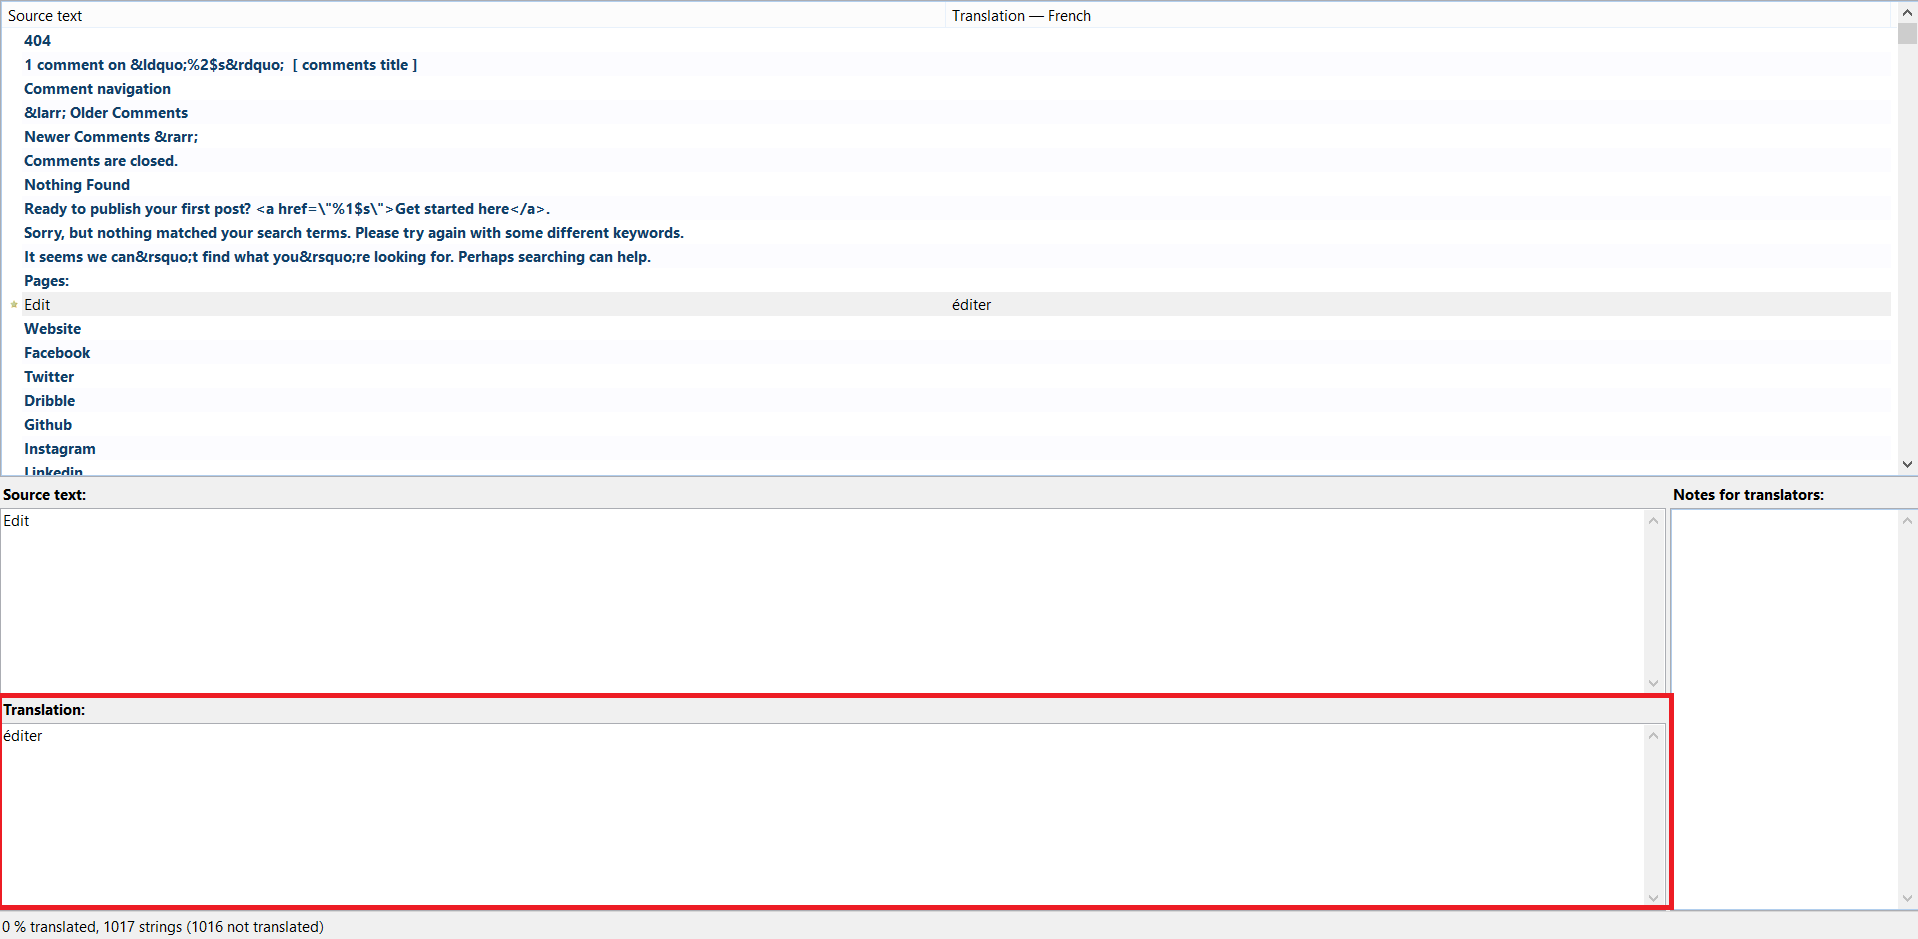
- When you have finished translating the required text click Save to save the file, this will create a .po and .mo file. It is important that the name you give the file is the same as the WordPress Locale for your language. For example for French the WordPress Locale is fr_FR, for Spanish it is es_ES. For a full list of these locale names visit http://wpcentral.io/internationalization/.
- With the files saved you need to navigate to the theme’s languages folder on your server. Its address should be wp-content/themes/gym-life/languages. Add both the saved .po and .mo files to this directory.
- Go to your WordPress dashboard then click Settings -> General. Scroll down to Site Language. From the list choose the language you wish to translate the site to.
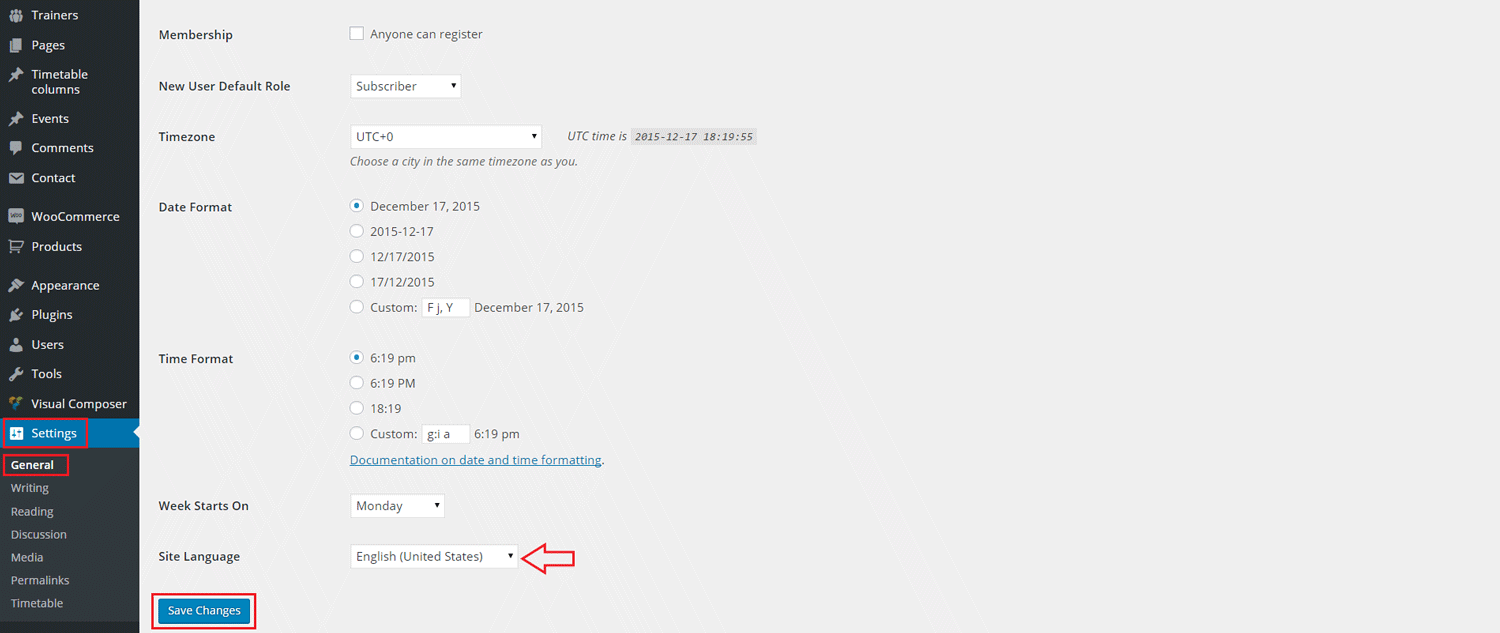
- Click Save Changes to Finish.
Credits
Once again, we would like to thank you for purchasing this theme, but we would also like to take this time to thank the creators of the following resources because without them this theme would not be possible.
- Option Tree
- Visual Composer
- Revolution Slider
- Bootstrap 3
- Slick
- Google Web Fonts
- jQuery
- Font Awesome
- baguetteBox.js
- TGM Plugin Activation
- FitVids.js
- Justified Gallery
- jQuery Popup Overlay
- jQuery Sticky
- skrollr
- Isotope
- jQuery countTo
- Waypoints
- WOW.js
- Sidr
- ImagesLoaded
- Easy Pie Chart
- SlipHover
Images
NOTE: None of the images used in the demo are included with this theme. Links to each of them can be found below.
Slider- http://www.bigstockphoto.com/image-91621520/stock-photo-brutal-bodybuilder
- http://www.bigstockphoto.com/image-51197818/stock-photo-group-of-fit-people-at-the-gym-exercising
- http://www.bigstockphoto.com/image-69463504/stock-photo-personal-trainer-helping-woman-working-with-dumbbells
- http://depositphotos.com/18975419/stock-photo-group-yoga-sessions.html
- http://depositphotos.com/79206374/stock-photo-women-and-instructor-working-out.html
- http://www.bigstockphoto.com/image-83021090/stock-photo-light-weight-dumbell-isolated
- http://www.bigstockphoto.com/image-83021096/stock-photo-light-weight-dumbell-isolated
- http://www.bigstockphoto.com/image-87699401/stock-photo-sneakers-isolated-on-white-background
- http://www.bigstockphoto.com/image-87699482/stock-photo-sneakers-isolated-on-white-background
- http://www.bigstockphoto.com/image-81749267/stock-photo-a-sporting-equipment-single-red-dumbbells
- http://www.bigstockphoto.com/image-81749276/stock-photo-a-sporting-equipment-single-red-dumbbells
- http://www.bigstockphoto.com/image-80630621/stock-photo-close-up-purple-yoga-mat-for-exercise-isolated
- http://www.bigstockphoto.com/image-80630669/stock-photo-close-up-purple-yoga-mat-for-exercise-isolated
- http://www.bigstockphoto.com/image-76676759/stock-photo-fitness-kettlebell
- http://www.bigstockphoto.com/image-74638525/stock-photo-fitness-kettlebell
- http://www.bigstockphoto.com/image-76676957/stock-photo-fitness-kettlebell
- http://www.bigstockphoto.com/image-74638513/stock-photo-fitness-kettlebell
- http://www.bigstockphoto.com/image-66719311/stock-photo-muscular-man-performing-workout-with-kettlebell
- http://www.bigstockphoto.com/image-81625229/stock-photo-my-regular-exercise-%21
- http://www.bigstockphoto.com/image-81094883/stock-photo-attractive-young-with-doing-workout
- http://www.bigstockphoto.com/image-59866478/stock-photo-female-fighter-posing-in-combat-pose
- http://www.bigstockphoto.com/image-54539828/stock-photo-fitness%2C-sport%2C-training%2C-gym-and-lifestyle-concept-group-of-smiling-people-working-out-with-dumbb
- http://www.bigstockphoto.com/image-76881161/stock-photo-weightlifting
- http://www.bigstockphoto.com/image-78561749/stock-photo-sport%2C-bodybuilding%2C-lifestyle-and-people-concept-young-man-and-woman-with-barbell-flexing-muscles
- http://www.bigstockphoto.com/image-93189269/stock-photo-sport%2C-fitness%2C-lifestyle%2C-gesture-and-people-concept-smiling-man-and-woman-showing-thumbs-up-in-g
- http://www.bigstockphoto.com/image-74369059/stock-photo-bodybuilder
- http://www.bigstockphoto.com/image-86445368/stock-photo-attractive-hunky-black-male-bodybuilder-posing-with-iron-chains
- http://www.bigstockphoto.com/image-87513788/stock-photo-fitness%2C-sport%2C-training%2C-gym-and-lifestyle-concept-group-of-women-working-out-with-dumbbells-and
- http://www.bigstockphoto.com/image-91058486/stock-photo-sportswoman-fit-sporty-woman-doing-push-ups-on-tire-strength-power-training-concept-crossfit-fitnes
- http://www.bigstockphoto.com/image-91307996/stock-photo-sport%2C-fitness%2C-bodybuilding%2C-teamwork-and-people-concept-young-woman-and-personal-trainer-flexing
- http://www.bigstockphoto.com/image-75280756/stock-photo-retro-vintage-insignias-or-logotypes-set-vector-design-elements
- http://www.bigstockphoto.com/image-85075088/stock-photo-fitness%2C-sport-and-diet-concept-young-sporty-woman-with-light-dumbbell
- http://www.bigstockphoto.com/image-80696585/stock-photo-brutal-athletic-woman-pumping-up-muscles-with-dumbbells
- http://www.bigstockphoto.com/image-88412972/stock-photo-muscular-man-and-fit-woman-workout-at-crossfit-gym
- http://www.bigstockphoto.com/image-90285548/stock-photo-strong-woman-bodybuilder
- http://www.bigstockphoto.com/image-71894554/stock-photo-weightlifting
- http://www.bigstockphoto.com/image-56887652/stock-photo-gym-and-fitness-room
- http://www.bigstockphoto.com/image-66382039/stock-photo-abdominal-plate-training-core-group-at-gym-fitness-workout
- http://www.bigstockphoto.com/image-67031434/stock-photo-fit-people-in-a-class-at-the-gym
- http://www.bigstockphoto.com/image-79683193/stock-photo-fitness%2C-sport%2C-powerlifting-and-people-concept-sporty-woman-exercising-with-barbell-in-gym
- http://www.bigstockphoto.com/image-90683126/stock-photo-women-in-a-boxing-class-training-high-kick
- http://www.bigstockphoto.com/image-89962559/stock-photo-group-of-people-in-a-pilates-class-at-the-gym
- http://www.bigstockphoto.com/image-81269090/stock-photo-two-yogi-female-exercising-in-class
- http://www.bigstockphoto.com/image-55273928/stock-photo-side-plank-yoga-pose-by-three-women
- http://www.bigstockphoto.com/image-76765064/stock-photo-two-women-doing-yoga-workout-at-gym
- http://www.bigstockphoto.com/image-87864098/stock-photo-young-woman-doing-yoga-exercises-on-yoga-mat-at-gym
- http://www.bigstockphoto.com/image-69610903/stock-photo-fitness%2C-sport%2C-training-and-lifestyle-concept-smiling-woman-with-exercise-ball-in-gym
- http://www.bigstockphoto.com/image-88412174/stock-photo-handsome-muscular-man-and-beautiful-sporty-woman-workout-with-jumping-rope-in-gym
- http://www.bigstockphoto.com/image-76996745/stock-photo-sport%2C-fitness%2C-lifestyle%2C-technology-and-people-concept-smiling-woman-exercising-on-treadmill-in-gym
- http://www.bigstockphoto.com/image-91976612/stock-photo-fitness%2C-sport%2C-training%2C-gym-and-lifestyle-concept-group-of-smiling-people-working-out-with-dumbbells-in-the-gym
- http://photodune.net/item/personal-trainer/6326067
- http://photodune.net/item/woman-with-earphones-exercising-on-treadmill/9922017
- http://depositphotos.com/18975419/stock-photo-group-yoga-sessions.html
- http://depositphotos.com/79206374/stock-photo-women-and-instructor-working-out.html
- http://depositphotos.com/79206296/stock-photo-students-doing-some-meditation.html
- http://depositphotos.com/46358537/stock-photo-yoga-class.html
- http://depositphotos.com/31456583/stock-photo-yoga-class.html
- http://depositphotos.com/53623771/stock-photo-woman-meditating-in-yoga-pose.html
- http://depositphotos.com/27211067/stock-photo-beautiful-young-woman-yoga-workout.html
- http://depositphotos.com/50054161/stock-photo-pregnant-woman-during-yoga.html
- http://depositphotos.com/55291463/stock-photo-pregnant-women-doing-relaxation-exercise.html
- http://depositphotos.com/39826867/stock-photo-difficult-yoga-pose.html
- http://depositphotos.com/50045317/stock-photo-yoga-class-in-lotus-pose.html
- http://depositphotos.com/38457565/stock-photo-two-sporty-women-stretching-body.html
- http://depositphotos.com/18975361/stock-photo-woman-in-lotus-position.html
- http://depositphotos.com/82909932/stock-photo-yoga-class.html
- http://depositphotos.com/38456859/stock-photo-fit-class-stretching-legs-on.html
- http://depositphotos.com/71293605/stock-photo-group-of-two-active-sportive.html